Showing posts with label Gesso. Show all posts

Tuesday, April 26, 2022

Fun Fold Shabby Chic Cards

I have got three fun fold cards to share with you today.


Card No. 1


I have used mauve cardstock for the base of this card

I cut pieces
11" x 4 1/4", 10 3/4" x 3 1/4" and 3 1/4" x 2 1/4"

I score and fold
the 11" piece at 2 3/4" & 5 1/2"
the 10 3/4" piece at 3 1/2"  & 6 1/2"
so both pieces resemble a Z

I have used Denise Boddey Day Dream Story Book - Dreams patterned paper.

I cut pieces
5 1/4" x 4"
2 @ 4" x 2 1/2"
3 1/4" x 3"
3" x 2 3/4"
4" x 3"

I also fussy cut the label with the florals attached from Denise Boddey ay Dream Story Book - Chapters patterned paper.

I used my Distress Tool and Black ink to distress the edges of all of the patterned papers.

The patterned papers are then attached to the two card panels. 
I have used double sided tape but you could also use glue if you wish.

I attached the smaller piece of cardstock to the larger piece of cardstock by attaching a piece of 1/2" double sided tape at both ends of the 10 3/4" piece of cardstock and layering it on top of the other piece so the larger section, of the 10 3/4" piece, is on the top of the card and the right hand edge is approx 1/2" from the right hand edge of the bottom panel.

The fussy cut piece is attached to the 3 1/4" x 2 1/4" piece of cardstock.
This is then attached to the front of the card with sticky backed foam behind it.

The sentiment is a stamp from the Woodware Word Fragments stamp set. I have stamped with Versafine Embossing Ink and heat embossed with Gold Embossing Powder.

Card No. 2


The cardbase for this card is Bazzill - Tutu Pink

I cut pieces
7" x 5 1/4" and 4" x 4"

I have scored and folded the 7" piece at 4 1/4" and the 4" piece at 1".

The smaller piece of cardstock is attached to the right hand edge of the larger piece so the fold butts up to the right hand edge and it is centred between the top and bottom of the card


I have cut pieces
5" x 4"
2 @ 2 1/2" x 5"
2 @ 2 3/4" x 3 3/4"


Once agin the edges have been distressed with my distressing tool and black ink.

The patterned paper is attached to the card panels using double sided tape.

To embellish this card I have cut Circle Frame Medium Chipboard in half and coated it with Gesso.
I attached the chipboard to the front of the card, next I layered a 4" strip if white lace and a fussy cut floral cluster from the same patterned paper.

The sentiment, once again came from the Woodware Word Fragments stamp set 
It is attached to the front of the card with a piece of scrap chipboard behind it.

Final touch for this card was to add three drops of Nuvo Drops - Morning Dew 
to the top and bottom of the left hand front panel.

Card No. 3


I have not made this style of card before.

It is a pocket with a decorated insert for your personal message or you could attach a gift card.

I have used a light green cardstock for this card.

I cut pieces
5 1/2" x 10 1/2" and 4 3/4" x 4 3/4"

I scored and folded the 10 1/2" piece at 5" and 10" on the long edge and 5" on the narrow edge
This is going to make a 5" square pocket

I cut the corner where the two fold lines meet out 
and the bottom 1/2" folded section on the other section of the cardstock.
You can see this more clearly in my YouTube video.

I have added double sided tape to the side and bottom tabs and folded the pocket in half 
using the tape to join the two sides together to form a pocket.

The patterned paper I am using for this card is Denise Boddey Designs - Elegance - Style

I cut 
2 @ 4 3/4" x 4 3/4"
2 @ 4 1/2" x 4 1/2"

Once again the edges have been distressed.

The patterned papers are attached to the pocket and the insert with double sided tape.

Before adding the patterned paper to one side of the insert use liquid glue to attach a piece of lace to make it easier to take your tag in and out of the pocket.

I used a circle die to cut a part circle from the top of the pocket. 
You could use a circle punch if you prefer.

To embellish the insert I fussy cut the castle from the patterned paper and attached it to the front. 
The back is for your personal message and/or to attach a gift card.

To embellish the front of the pocket I used liquid glue 
to attach 5 rows of lace to the bottom 3/4 of the pocket.

A piece of chipboard foliage, that has had a coat of Gesso, was layered onto of the lace 
and a fussy cut floral piece was added on top of that.

I used Craft Barn- Primrose Stamp & Die set to cut the flower from the same patterned paper.

A good coat of Wink of Stella Clear added sparkle to the chipboard.

The sentiment is from Uniquely Creative.

So these are the three cards for today.

For more detail you can see me create these cards in this video


If you have any questions please leave them in the comments below and I will get back to you.

Thank you for spending part of your day here with me today
Till next time
Stay safe
Hugs
Julie


Friday, April 1, 2022

Design Team project for Mystical Scrapbook's April Challenge

Good morning to you,
how are you today?

Today I am sharing the layout I created using one of the two colour palettes 
over at Mystical Scrapbooks for their April challenge.

This is the colour palette I am using


and here is my layout


I have used Uniquely Creative's The Story Garden papers for this layout.

I cut a 1" frame from a 12" piece of Character to create the page frame.

A piece of English Rose was trimmed to 11 1/2", the edges were inked using a 
Versa Color black ink cube and the two papers were attached 
to each other using double sided tape.

Using Cadence MU-13 Stencil and my palette knife I added Modelling Paste randomly to the background.

I used Gesso to coat a frame from Memory Maze's Junky Frames & Arrows chipboard set.
When this was dry I coloured it using Glimmermist, colour Starfish.


My photo is 5' x 7", I cut two mats for the photo, 
one from Stories that is 5 1/2" x 7 1/2" and 
one from Character that is 6" x 8".
I used an emery board to file around the edge of the photo 
before inking around the edges of all of the layers and attaching them to each other.
I also added a layer of sticky backed craft foam to the photo panel

I fussy cut all of the elements from Marvellous and the Cut a Part sheet and inked the edges.

Time now to assemble my page

I added the chipboard first and then the photo.

I then played around with the placement of all of the fussy cut elements 
and once I was happy with the layout I used my Art Glitter glue
 to attach everything to the page.


I used a Uniball Eye black fineline pen to draw a scribbly border around my page 
and write the date the photo was taken on one of the tabs at the top of the photo.


The title was cut from the Characters paper using my Apple Blossom Large Numbers & Suffixes die.

The title is attached at the bottom left of the photo.

A coat of Glossy Accents was added to the title and 
the gold locket amongst the photo cluster at the bottom right of the photo.

A coat of Wink of Stella clear shimmer pen to all of the flowers finishes this layout.

Here is my process video if you would like to see this page come together.


I hope you enjoy watching it

As always I appreciate you spending part of your day here with me today
Till next time
Stay safe
Hugs
Julie


Friday, March 25, 2022

Art Journal Page

Hi there

Today I am sharing my latest art journal page.


I have used two pages from my Happy Planner notebook.
I have glued them together and given one side of the page a coat of white Gesso

To colour the background I have applied Gelatos and blended them using my finger.

I have used 
Lemon
Gold Champagne
Tangerine 
and Grape

My next layer is random stamping with StayzOn Jet Black Ink 
and a background stamp that I don't know the name or brand of.
You can see the stamp in the video if you are interested to see what it looks like

Next layer for the background is Modelling/Texture Paste through a Mandala stencil

To create the hearts I applied Paper Mill Alcohol Inks to a sheet of Gloss Photo paper 
and used my air puffer to move the ink around.

The inks I used are
Lemon Yellow Shimmer
Burnt Orange Metallic
Silver Metallic
Gold Metallic
Rolling Waters Metallic
Purple Sequin Metallic
Silvery Metallic
and Penny Loafer Metallic

Once the inks were dry I used my Cutterbee scissors 
to cut an assortment of sizes of heart shapes from the card.

These were attached to my page using Matt Medium, being careful 
not to smudge the background, as I had not sealed it.

Watered down white acrylic paint was splattered all overt the page next

I drew a sketchy line just inside the edge of each of the hearts 
and a scalloped decorative border around the outside of each heart.

A sketchy boarder was also added to the edges of the page.

The quote is from the internet, I printed it onto copier paper,
trimmed it and added it to the page using Art Glitter glue.

I used my black Fudeball pen to draw a sketchy border around the quote.


Here is my process video


Thank you for spending part of your day here with me today
If you have any questions or suggestions please leave them in the comments

Till next time
Stay safe
Hugs
Julie

Tuesday, March 1, 2022

Mystical Scrapbooks March Challenge

Hi there.

Today I am sharing the layout I created for the March challenge over at Mystical Scrapbooks.

The theme over there this month is mood boards and there are two of them to choose from
 or maybe even create a layout for both of them.

This is the moodboard this layout was created for.


This is my layout


The background for this layout started life completely different to how it links now.

I gave my white cardstock a coat of white Gesso.

Originally I used Distress Inks and plastic packaging to colour where the red is now. 
I used Barn Door but when it dried it was more pink than bright red.

Not happy with the colour I used a sponge to dab red acrylic paint over the top of the ink.
I then splattered white acrylic paint over the red.

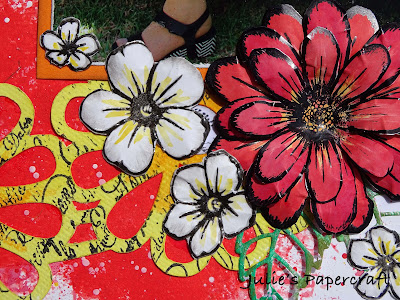
The flower frame is a cut file from Page Evans

I stamped a text stamp with StayzOn Jet Black ink all over the cut file.

I used Distress Ink Mustard Seed and a wet brush to colour the cut file and then
Carved Pumpkin and a fine brush to add a little detail to the centre of the flowers.

I punched a few circles from white cardstock, stamped them with the same stamp and ink
to fill the holes in the centre of the flowers.

I used Art Glitter glue to attach the cut file to the page 
so it sat over the painted section of the background.

I am using a 6" x 4" photo, I filed around the edge of the photo with 
an emery board before matting it onto some orange cardstock.

I also added some cardboard to the back of the mat.
This assembly was then attached to the layout.

I used Heartfelt Creations Daisy Patch Flowers to stamp and heat emboss three layers of the flower.
I used Mustard Seed and Barn Door Distress Inks to colour the flower.

I also stamped and heat embossed Picket Fence - Flowers for the Picking.

I used my flower shaping tools to shape all of the flowers.

All of the flowers were attached to the layout with liquid glue.


I trimmed my white background down to 11 1/2" square and matted it 
onto a 12" piece of black cardstock to give it a nice dark border

The title was die cut from black cardstock using my 
Kaisercraft DD700 Alphabet Upper Case dies
and attached using my t-ruler and liquid glue.

I used my fountain pen to draw a double scribbly border around the page and the flower centres

I have a process video you might like to watch


Thank you for spending part of your day here with me today.

Till next time
Stay safe
Hugs
Julie


Tuesday, February 1, 2022

Mystical Scrapbooks February Challenge

Good morning

Today I am sharing the layout I created for the February challenge at Mystical Scrapbooks

There is a sketch challenge this month and this is the sketch I created for the challenge.
There are two challenges and two sketches for you to use.


The added requirement for this challenge is to use some altered chipboard on your page.

This is my layout
You can see it closely follows the sketch.


The paper I have used for this layout is Mechanism from Kaisercraft's Time Machine range.

The background is white cardstock

I tore two strips approximately 2" wide and 2 approximately 1/2" wide 
and layered the 1/2" strip behind the 2" strips.
These were then attached to the sides of my layout.

My photos are 4" x 3", I filed around the edge of each one 
with an emery board to give a thin white border.
I then matted them onto the dark side of the Mechanism patterned paper

I have added scraps of chipboard to the back of my photos 
to give them a little lift when I attach them to my layout

I have used two packets of chipboard on my layout.

I coated the chipboard with white Gesso and then

I wanted the Dusty Attic Cog Border #3 to look a bit rusty and old 
so I added some textured brown paint, 
that I have had in my stash for about 20 years,
just randomly around the edges.


I painted these with the same silver metallic paint so they had the same look as my chipboard.


I tucked the border chipboard edge under the side strips, 
using liquid glue to hold it in place.

I attached the photos to the layout, then added the single cogs, both chipboard and metal,
so some of them overlapped the photos.

I wanted some of the chipboard elements on the side panels. 
I painted them with black acrylic paint so they would stand out better on the green paper
 and attached them using Art Glitter glue.
I find that this glue works extremely well for attaching chipboard and metal objects.


To create the title I used my Kaisercraft Alphabet Upper Case dies
 to cut "Toys" from the same patterned paper.

I attached these to a piece of acetate, added thin strips of chipboard 
behind the first two letters, before attaching it at the bottom of my page 
so it overlapped the vacant area of the bottom photo.
I gave the title a coat of Glossy Accents for a nice shine.


Here is my process video. I hope you enjoy watching it.


Thank you for spending part of your day here with me today

Till next time
Stay safe
Hugs
Julie


Thursday, January 13, 2022

Design Team layout for Off the Rails Scrapbooking's January 2022 challenge

Good morning

The challenge over at Off the Rails Scrapbooking this month is 
Re-use, Recycle & Repurpose.
I have interpreted that as using items from my stash that have been there for many years.
You will find the challenge here.

The photos on my layout are of my Mum taken while we were celebrating her 89th birthday
in December 2021


The chipboard frame has been in my stash for so many years 
I have no idea where I got it or what brand it is.

I have given it a coat of Gesso then sprayed it with Tattered Angels Chalkboard spray in white
and when that was dry I sprayed it with Tattered Angels Glimmermist in Iridescent Gold.

The patterned papers are from a 12" paper pad by DCWV called Love & Grace.
I purchased this pad from Spotlight a few years ago also.

I used Art Glitter glue to attach a patterned paper to the back of the frame

I trimmed the background patterned paper to 11 1/2" square
and attached it to a 1" white cardstock frame.
I took this to my sewing machine and stitched a row of zig zag 
and a row of straight stitching around the edge of the patterned paper

The frame was then attached to the background using my hot glue gun

The two 6" x 4" photos were attached to the layout using foam squares so they sat flat over the frame.

To embellish the layout I cut a 3" x 4" cut apart from one of the sheets of patterned paper,
cut the top so it looked like a tag, then heat embossed around the edge of it

I used my Crop-O-Dile to add a gold eyelet to the tag.
 I threaded some sheer gold ribbon through the eyelet.

Using Woodware's Mini Garden Spray stamp, I stamped and heat embossed
the flowers onto white cardstock. I used the same gold embossing powder.

I fussy cut these flowers.


I used my hot glue gun to attache the tag and the flowers to the layout.

The tiny embroidered flowers and leaves were another item from my stash and had been given to me by my Mum. I loved the idea of using them on this layout about her.

I added a coat of Wink of Stella to the flowers. Unfortunately I picked up the white one instead of the clear one and instead of giving my flowers a nice sparkle I managed to dull down the gold detail of the heat embossing.

*Note* I used a baby wipe to wipe over the flowers a day or so later and luckily removed a good amount of the white

The title is heat embossed chipboard numbers. 
I have used the same embossing powder I used 
for all of the other heat embossing.

I have used Art Glitter glue to attach the title to the bottom right of the frame 


Here is my process video if you would like to watch this layout come together


Thank you for spending part of your day here with me today

Till next time
Stay safe
Hugs
Julie