Showing posts with label Nuvo Drops. Show all posts

Tuesday, April 26, 2022

Fun Fold Shabby Chic Cards

I have got three fun fold cards to share with you today.


Card No. 1


I have used mauve cardstock for the base of this card

I cut pieces
11" x 4 1/4", 10 3/4" x 3 1/4" and 3 1/4" x 2 1/4"

I score and fold
the 11" piece at 2 3/4" & 5 1/2"
the 10 3/4" piece at 3 1/2"  & 6 1/2"
so both pieces resemble a Z

I have used Denise Boddey Day Dream Story Book - Dreams patterned paper.

I cut pieces
5 1/4" x 4"
2 @ 4" x 2 1/2"
3 1/4" x 3"
3" x 2 3/4"
4" x 3"

I also fussy cut the label with the florals attached from Denise Boddey ay Dream Story Book - Chapters patterned paper.

I used my Distress Tool and Black ink to distress the edges of all of the patterned papers.

The patterned papers are then attached to the two card panels. 
I have used double sided tape but you could also use glue if you wish.

I attached the smaller piece of cardstock to the larger piece of cardstock by attaching a piece of 1/2" double sided tape at both ends of the 10 3/4" piece of cardstock and layering it on top of the other piece so the larger section, of the 10 3/4" piece, is on the top of the card and the right hand edge is approx 1/2" from the right hand edge of the bottom panel.

The fussy cut piece is attached to the 3 1/4" x 2 1/4" piece of cardstock.
This is then attached to the front of the card with sticky backed foam behind it.

The sentiment is a stamp from the Woodware Word Fragments stamp set. I have stamped with Versafine Embossing Ink and heat embossed with Gold Embossing Powder.

Card No. 2


The cardbase for this card is Bazzill - Tutu Pink

I cut pieces
7" x 5 1/4" and 4" x 4"

I have scored and folded the 7" piece at 4 1/4" and the 4" piece at 1".

The smaller piece of cardstock is attached to the right hand edge of the larger piece so the fold butts up to the right hand edge and it is centred between the top and bottom of the card


I have cut pieces
5" x 4"
2 @ 2 1/2" x 5"
2 @ 2 3/4" x 3 3/4"


Once agin the edges have been distressed with my distressing tool and black ink.

The patterned paper is attached to the card panels using double sided tape.

To embellish this card I have cut Circle Frame Medium Chipboard in half and coated it with Gesso.
I attached the chipboard to the front of the card, next I layered a 4" strip if white lace and a fussy cut floral cluster from the same patterned paper.

The sentiment, once again came from the Woodware Word Fragments stamp set 
It is attached to the front of the card with a piece of scrap chipboard behind it.

Final touch for this card was to add three drops of Nuvo Drops - Morning Dew 
to the top and bottom of the left hand front panel.

Card No. 3


I have not made this style of card before.

It is a pocket with a decorated insert for your personal message or you could attach a gift card.

I have used a light green cardstock for this card.

I cut pieces
5 1/2" x 10 1/2" and 4 3/4" x 4 3/4"

I scored and folded the 10 1/2" piece at 5" and 10" on the long edge and 5" on the narrow edge
This is going to make a 5" square pocket

I cut the corner where the two fold lines meet out 
and the bottom 1/2" folded section on the other section of the cardstock.
You can see this more clearly in my YouTube video.

I have added double sided tape to the side and bottom tabs and folded the pocket in half 
using the tape to join the two sides together to form a pocket.

The patterned paper I am using for this card is Denise Boddey Designs - Elegance - Style

I cut 
2 @ 4 3/4" x 4 3/4"
2 @ 4 1/2" x 4 1/2"

Once again the edges have been distressed.

The patterned papers are attached to the pocket and the insert with double sided tape.

Before adding the patterned paper to one side of the insert use liquid glue to attach a piece of lace to make it easier to take your tag in and out of the pocket.

I used a circle die to cut a part circle from the top of the pocket. 
You could use a circle punch if you prefer.

To embellish the insert I fussy cut the castle from the patterned paper and attached it to the front. 
The back is for your personal message and/or to attach a gift card.

To embellish the front of the pocket I used liquid glue 
to attach 5 rows of lace to the bottom 3/4 of the pocket.

A piece of chipboard foliage, that has had a coat of Gesso, was layered onto of the lace 
and a fussy cut floral piece was added on top of that.

I used Craft Barn- Primrose Stamp & Die set to cut the flower from the same patterned paper.

A good coat of Wink of Stella Clear added sparkle to the chipboard.

The sentiment is from Uniquely Creative.

So these are the three cards for today.

For more detail you can see me create these cards in this video


If you have any questions please leave them in the comments below and I will get back to you.

Thank you for spending part of your day here with me today
Till next time
Stay safe
Hugs
Julie


Sunday, March 20, 2022

DT projects for Denise Boddey Designs

Good morning

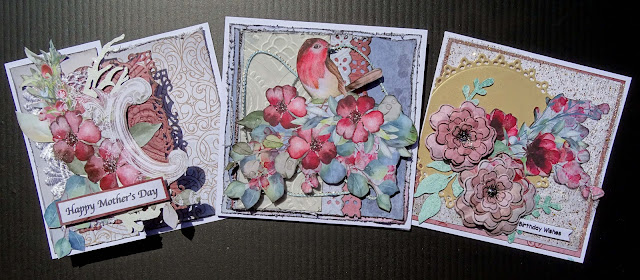
Today I am sharing three cards I made with the beautiful 


The first card is a Z fold card


I create all of my own card bases using 300gsm smooth white cardstock.

For the first card I cut a piece of cardstock 10 1/2" x 5 1/4"
I scored it at 2 5/8" and 5 1/4"
The card is folded in half on the 5 1/4" score and the fold at the 2 5/8" score is a valley fold.

All of the patterned paper on this card have had the edges distressed 
with my distressing tool and inked with a black Versacolor Ink cube.

I cut three pieces of Song Blossom
 1 @ 5" square
2 @ 2 3/8" x 5"

These were attached to the three sections you can see when your card is open.

I used my Spellbinders Decorative Labels 8 and Enchanted Florals to cut a panel.
I ran this panel through my Big Shot with Couture Creations 
Flamingos & Hedgehogs embossing folder.

I swiped my black ink cube over the front of this panel to help the design stand out a little more.

 The panel was then attached to the front for the card so it over hangs the 2 5/8" folded line.

I trimmed a piece of scalloped lace and attached that overlapping the left edge of the rectangular panel.

I have painted a piece of chipboard white and added that on top of the lace.
A layer of clear Wink of Stella added a little sparkle to my chipboard.
I am not sure of the name of this chipboard, it looks like a sea grass. I have cut it in half to use.

I have fussy cut images from Natures Romance and Song Blossom
to embellish further. These were added on top of the chipboard.

The sentiment is computer generated, it is matted it onto a piece of Enchanted Florals 
and attached it to the card front with a piece of cardboard behind it.


The second card is an easel card


The card base is the same size as the previous card and scored at the same measurements.

I have also cut a 5 1/4" square piece of the same cardstock.

Fold your card in half at the 5 1/4" score and a mountain fold at the 2 5/8" score line.

Flatten the front of the card base, and with your card sitting right was up,
apply glue to the right hand half of the the front section.

Lay the 5 1/4" square of cardstock directly on top of the cardbase, 
being sure to line up all of the edges.

Now we have our cardbase ready to decorate.

All of the edges of the patterned papers on this card have been distressed
in the same way as the first card.

I cut two 5" squares from Garden Letters and two pieces 2 3/8" x 5" from Natures Romance

One of the 5" squares was attached to the front of the card 
and the other was attached to the inside back panel.

The two smaller pieces were attached to the inside folded section of the card.

I also cut another piece of the Garden letters 4 3/4" square.
I used the reverse side of the paper and attached it to the front of the card

I used a Martha Stewart punch to punch along 
one of the longer sides of a 3 1/2" x 4 3/4" piece of Enchanted Florals 

I cut a piece of the Natures Romance 3" x 4 3/4" 
and punched along one of the longer edges with the same punch.

 I layered these on top of each other lining the left hand edges up with each other 
with the punched edge on the right.

These were then attached to the front of the card.

I used the Couture Creation's Flamingos & Hedgehogs embossing folder 
to emboss a 2 1/4" x 4 3/4" piece of velum and attached that on top of the previous layers,
once again lining up the left hand edges.

A piece of blue and gold braid was attached on top of the panel so it curled around the panel randomly

My main embellishment was fussy cut from Song Blossom and attached to the front of the card with cardboard behind it

I added a light coat of Glossy Accents to he flowers in the image to give it a little shine.


The sentiment is from Uniquely Creative and is matted on a piece of the Enchanted Florals paper.

This was attached to the inside back of the card with a piece of cardboard behind it, this is what holds the card open for display

I added a few drops of Nuvo Drops - Morning Dew 
randomly on the fussy cut image to finish this card off.

Card 3

This is a 5 1/4" square card


I cut my cardbase 10 1/2" x 5 1/4", scored and folded at 5 1/4" on the long side.

The patterned papers on this card have the edges inked with a black Versa Color ink cube.

The base layer for this card is a 5" piece of Enchanted Florals.

The next layer is a 4 3/4" piece of Natures Romance

I have cut a piece of tulle that has gold particles in it to 5" square and attached that next.

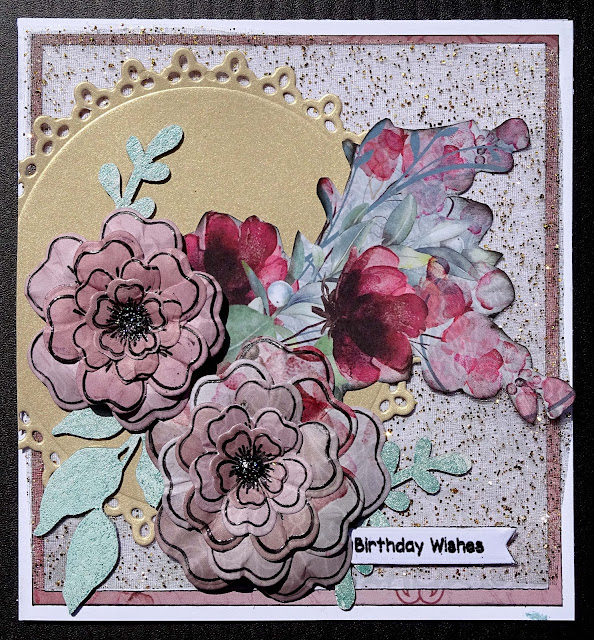
Lifestyles Nesting Doily Circles die and pearlised gold cardstock 
were used to create a doily for my next layer.

I have painted some chipboard leaves from Botanicals and Delicate Branch
with pearlescent water colours.

Before assembling them I used my flower shaping tools to give them some dimension.

I have fussy cut a section from Song Blossom to be the foundation for my embellishment cluster.

The flowers and leaves were added next.
The flowers are mounted on cardboard.

The heat embossed sentiment was added next.

Finally I added Nuvo Glitter Drops - Midnight Sky
to the centre of each of the flowers.

Here is my process video. I hope you enjoy watching it


Thank you for spending part of your day here with me today
Till next time
Stay safe
Hugs
Julie


Sunday, February 20, 2022

Making flowers using dies

Good morning

Today I am sharing a video showing how I create five flowers using an assortment of dies.

The shaping techniques I use on these flowers can be used on any fussy or die cut flowers.

You will find links to most of the products I use to make these flowers in the video description box.

These are my flowers


Hope you enjoy watching my video.


Thank you for sharing part of your day here with me today

Till next time
Stay safe
Hugs
Julie


Wednesday, February 16, 2022

February inspirational post for Mystical Scrapbooks

Good morning

Today my post is about using chipboard on cards.

The feature product this month at Mystical Scrapbooks is chipboard so I decided to remind myself and you that chipboard is great for cards.


I cut pink cardstock to 10 1/2" x 5 1/4", scored at 5 1/4" on the 10 1/2" side.
This makes a 5 1/4" card

The papers I used for these cards is Couture Creations Peaceful Peonies.

The beautiful lace is from my Mum.

For the top card I cut Patterned paper No. 10 to 5" square and 4 strips 1" x 5"
I distressed the edges of all of the patterned paper 
and then inked the edge using my VersaColor black ink cube.

I attached the 5" square using Art Glitter glue
and the 1" strips were attached with foam squares.


I used my hot glue gun to attach the lace about 2/3rds of the way up the card front.

I fussy cut several flowers from Patterned Paper No 6.

I inked the edges of the flowers and attached them to the card front.

A 4 1/4" x 1" strip that had been distressed and inked is attached to the card front, 
about 1/3rd of the way up from the bottom. This is where I will put the greeting

The chipboard I used on this card is from the "Around the World in 8 weeks" 
challenge that was held by Mystical Scrapbooks last year

I sprayed it with white undercoat and then covered it with gold ink.

The greeting was stamped using LDRS Happy Birthday Stack 
and die cut using LDRS Sentiment Stack die.

I stamped it with Versafine Onyx Black Ink and heat embossed with clear embossing powder.

Final step was to add a few drops of Spun Sugar Distress Stickles


Card No. 2


The papers for this card are Patterned Paper No 1.

I cut a 5" square piece and a 2" x 5" piece.

I cut 2 pieces 1/2" x 5" and attached one to each of the long edges.

I attached the lace vertically, approximately the middle of the card.

I added some fun foam to the back of the strip and then attached it to the front of the card
so it slightly overlapped the edge of the lace.

I then attached some of the fussy cut flowers to the panel.


The chipboard for this card is from Memory Maze - Wire Butterfly Set.
I added a coat of Nuvo Drops - White Blizzard 
to the undercoated chipboard before attaching it to the card.

The sentiment is a Rub On (from Kaisercraft I think) and is attached to the card using foam squares.

While the Nuvo Drops were still wet I sprinkled Spellbinders Sparkle Dust Glitter
over it and then tipped the excess off.

Once again I added a few dots of Spun Sugar Distress Stickles randomly on the card front.

You can see my process video here


Thank you for spending part of your day here with me today

Till next time
Stay safe
Hugs
Julie

Friday, January 7, 2022

Cards using Prima's Nature Garden 6" paper pad

Good morning

Today I am sharing a couple of cards I made using Prima's Nature Garden paper collection.
This is a very old collection and I don't think it is still available.

My aim with these cards is to use items from my stash

Both of the cards are 4" x 5 7/8" and cut from 240 gsm smooth white cardstock


Let's start with the first card


I have used two sheets of the same patterned paper for this card.
I have cut a piece 3 7/8" x 5 3/4" for the background,
a piece 2" x 4" and a piece 1" x 3" to make the fishtail pennants.

I also cut white cardstock to mat the pennants.
These measure 2 1/8" x 4 1/8" and 1 1/8" x 3 1/8"

I have inked around the edges of all of the patterned paper and cardstock 
with a Versa Color Cocoa ink cube.

The background patterned paper is attached to the card-base using double sided tape.
A layer of craft foam was attached to the back of the pennants 
before they were attached to the card front. The thinner pennant overlaps the wider one.

A strip of white lace was attached under the thinner pennant at the same time 
it was attached to the card front. I used Art Glitter glue to do this.

I used my Tim Holtz Tattered Florals die to create the flower on this card.
Here is the showing how I created this flower.


A piece of cheese cloth and a black & white Baker's Twine bow 
were added under the flower. It was attached using hot glue.

The sentiment is chipboard that has had a coat of white gesso.
I then coloured it with the Cocoa ink, this did not stand out enough 
so after I had attached it to the card I swiped over it with my black ink cube.


For the inside I cut a piece of the same patterned paper 3 7/8" x 5 3/4", inked the edges with Cocoa ink and used double sided tape to attach it to the inside right panel of the card.

I stamped happy birthday using Scrapbook.com's Happy birthday to You stamp
with Versafine's Onyx Black Ink onto white cardstock. 
I then used my heat tool and Clear Embossing powder to heat emboss the sentiment

I trimmed the cardstock down, inked the edges and attached it in the centre of the patterned paper.

I had a flower that was left over from a previous project, it was cut using Cheery Lin's Chrysanthemum Strip die and white cardstock. I attached the flower
 and added a little Nuvo Vintage Drops in Peachy Keen to the centre just to finish it off

The second card


All of the papers and cardstock on this card have had their edges inked with a black Versa Color ink cube.

I chose two patterned papers from the pad for this card.
I cut one 3 3/4" x 5 5/8" and the other 2" x 5 5/8"

A piece of white cardstock was cut to 2 1/4" x 5 5/8" to mat the smaller piece of patterned paper.

I added some scrap chipboard to the back of this panel.

After I had attached the large piece of patterned paper to the front of the card base I used some Art Glitter glue to attach half a paper doily so the edge of it lined up with the right hand edge of the card front.

The patterned paper panel was then attached so that it slightly overlapped the edge of the paper doily

A strip of lace was attached to the centre of the panel using double sided tape.

To embellish the front of the card I stamped all of the flowers and leaves in 
Heartfelt Creations - Botanical Rose stamp set onto smooth white cardstock

To colour the flowers I used Distress Inks in Victorian Velvet and Bundled Sage and 
Distress Oxide inks in Speckled Egg and Tattered Rose

I smudged my inks onto an acrylic block and then used my water brush to 
add the colour to the stamped images.

I then fussy cut them using my spring assisted scissors

I added Nuvo Jewel Drops in Sea Breeze to the centre of each flower

I had an oval chipboard frame from Imaginarium Chipboard.
I gave it a coat of gesso and them coloured it with the 

These were all attached to the card front using hot glue

The sentiment is from Uniquely Creative's Ocean Breeze Mini Cut a Part sheet.


For the inside I cut two strips of the same patterned paper I used
 as the background panel on the card front to 1" x 5 5/8", 
I attache one strip to each side of the back inside panel.

You will find my process video below


Thank you for spending part of your day here with me today

Till next time
Stay safe
Hugs
Julie


Tuesday, December 7, 2021

Vintage Christmas Cards

Good morning

Today I am sharing three vintage Christmas cards.

All three cards are 5" square, created using Coredintaions Vanilla Cream cardstock.

Each card also uses Bo Bunny's Father Christmas paper range from 2011.
All of the paper layers have been distressed using my Prima Distressing tool and a black ink cube.


OK let's start with 
Card No. 1


The two background layers are 4 3/4" square and 4 1/2" square

The strip of red patterned paper is 2" x 4" and the cream cardstock is 1 1/2" x 4"

The square patterned papers are attached to the card base with double sided tape

There is a piece of chipboard between the red patterned paper strip and the lace,  
(the lace is a gift from my Mum)
which is attached with liquid glue

Three sparking red poinsettia (a gift from my Mum) are attached down the length of the cream cardstock, 
also attached with liquid glue

The sentiment is stamped using Versafine Onyx Black ink and a stamp from
Kaisercraft's Christmas Edition stamp set.

I die cut the sentiment using a lacy rectangle die, added a piece of chipboard behind it
and attached it to my card front.

The inside of the card


I have cut a piece of red patterned paper 1 1/4" x 4 1/2" and a green piece 3/4" x 4 1/2".
These have been layered onto each other and attached to the left of the inside back panel.

The greeting is stamped using Versafine Onyx Black ink and Kaisercraft's Christmas Greetings stamp set.
This was then covered with clear embossing powder and set using my heat tool.

Card No. 2


Each of the patterned paper layers on this card are matted on a piece of cream cardstock.

Paper sizes are:-
Patterned paper No1. 4 3/4" square
Patterned paper No.2 4 1/4" square 
Cream Cardstock 4 1/2" square and 3 1/4" square.

For the focal point on the front of the card I used an image from the cut-a-part sheet which is 3" square.

Between the cut-a-part image and the 3 1/4" cream cardstock 
I have added a 4" square piece of glitter tulle.

On the inside


I cut "Merry Christmas" from Uniquely Creative's Holly Jolly Christmas 6" paper pack
and  matted it onto a 2 1/2" square piece of patterned paper.

I stamped and heat embossed a Christmas tree from a free stamp set I received with a magazine.
The magazine was Creative Cardmaking.

I added dots of Nuvo Crystal Drops in Autumn Red to the heat embossed tree.

Card No. 3


This card has all of the patterned papers matted on gold mirror card.

The patterned papers measure 4 3/4" square, 4 1/4" square and 3 1/8" x 3 5/8"

The gold card is 4 1/2" square and 3 1/2" x 3 5/8"

on the smallest piece of patterned paper I have put Decofoil Transfer Gel Duo
through a Christmas tree stencil.
When the gel was dry I added gold foil using my brayer.

Inside the card


I cut a piece of patterned paper 4 1/2" square and attached it to the inside of the card.

I used another "free with magazine" stamp to stamp and heat emboss
a sentiment to the patterned paper.
The magazine was Australian Papercraft Essentials

Here is my process video
I hope you will check it out


Well that's it for today
Thank you for spending part of your day here with me today
Till next time
Stay safe
Hugs
Julie


Monday, November 29, 2021

Layout for Mystical Scrapbooks

Good morning, good morning

Today I am sharing a layout I created for Mystical Scrapbooks. 
The theme for November is to scrap lift a favourite layout. 
This is my second layout for this month. 

Here is my layout


and this is the layout I have lifted.
It is by Mandy Melville from November 2016.
I loved the simplicity of the layout
You will find her blog post here.


I turned the layout on its side as my photo was portrait orientation
while the one on Mandy's layout was landscape orientation.

I used Uniquely Creatives Days of December paper collection for this layout.

As the photo is of my Grand-Daughter in one of her theatrical performances
I wanted to have lots of sparkle on this layout.
The photo started life 6" x 6" but I trimmed it down to 3 3/4" x 6"

I used a sheet of American Crafts POW Gold Glitter Paper as my background.
I did not want to waste this beautiful paper so I cut a 1" frame from it. 
This gives me the centre section to use on other parts of the layout. 

I trimmed a piece of white cardstock to 11 1/2" square to use as my background.

To add some interest to my background I used 
Nuvo Glitter Drops- White Blizzard, through TCW Stencil - Two Hearts
The Nuvo Drops do not stand out from the white cardstock very much
but they do add lots of texture and sparkle.

Next I used my Prima Stitched Rectangle stamp and Versafine Onyx Black ink
 to stamp some straight stitched lines randomly on to the background.


I used Hero Arts Infinity Rectangles die with my Big Shot to cut six assorted sized rectangles from the gold glitter card.

I cut "The Season" patterned paper to 6 1/2" x 5" and 3/4" x 2" and
"Good Cheer" patterned paper to 4 1/2" x 4" and 3/4" x 2 1/2"
I cut a fish tail in one of the narrow ends of the two smallest pieces of patterned paper.

I inked the edges of all of the patterned and glitter card.


I filed the edges of my photo with an emery board and matted it onto some black cardstock.
Before adding it to the patterned paper cluster, 
I attached some chipboard to the back of the photo mat.

For my title I used Dusty Attic Picture Perfect chipboard.
I used my VersaMark Embossing Ink to heat embossed the chipboard
 with gold on the top and black on the bottom.
You can see how I did this in the process video below.


Now that I have all of my elements ready I attached them to my layout background

I used my Uniball Mico black pen to draw a double scribbly border around my page

As a final sparkly touch I sprinkled 28 Lilac Lane gold sequins onto the layout and attached them using liquid glue and my Silhouette Pick Me Up tool.

Here is my process video
I hope you enjoy watching it.


Thank you for spending part of your day here with me today.

Till next time
Stay safe
Hugs
Julie