Showing posts with label embossing. Show all posts

Wednesday, June 15, 2022

Mystical Scrapbooks June Inspiration

Good morning

I have got two masculine cards to share with you today

I have taken a couple of requirements from Week 2 and Week 4 of the Retro TV Programs competition at Mystical Scrapbooks to create these cards.

As I have had Covid and done some casual full time work for the AEC I have not had the opportunity to create a project for these weeks and thought I would do it this way.

Here are my cards


Lets start with the first card


I created this card using a couple of requirements from Week 2
Use shades of blue and a grid design.

I have used a pale blue cardstock for my 5 1/4" card base
A piece of white cardstock was trimmed to 5" square and embossed with a 3D embossing folder

paper that are approx 2" in size.

All of the papers/cardstock were distressed with my distressing tool and my Versa Color black ink cube

Scrap cardboard was attached to the back of the squares of patterned paper before they were attached to the white embossed cardstock

This panel was then attached to the card front.

The sentiment was attached to a piece of burlap and then attached to a piece of the same cardstock that I used to create the card base.
A piece of scrap cardboard was attached between the sentient and the card front.

To embellish this card I used a few cogs from Uniquely Creative's Silver Metal Cogs.


For the second card I used some of the requirements from week 4

Vintage and Washi Tape


I have created the 5 1/4" card base using a light kraft colours cardstock

The rust coloured cardstock is from the optional competition kit and measures 5" square

The patterned paper is a 4 1/2" square piece from Uniquely Creative's Drive and Fly - Train

All of the edges were distressed in the same way the previous card was.

I added some torn pieces of Washi Tape from the optional kit 
to the bottom left and top right of the patterned paper panel

To embellish this card I used the chipboard stars from the optional kit and an arrow from 

I painted them with two coats of white acrylic paint
one coat of Rust acrylic paint and a coat of 


The papers/cardboard were attached to the front of the card with a piece of scrap cardboard behind the plain cardstock.

The chipboard was then attached using liquid glue and the sentiment, which is from Paper Roses - All Occasions Sentiment pack was the last thing to be added

So there we have my two cards for today

I hope you find some inspiration and check out the competition over at Mystical Scrapbooks.

Here is my process video
I hope you enjoy it


Till next time
Stay safe
Hugs
Julie


Sunday, March 20, 2022

DT projects for Denise Boddey Designs

Good morning

Today I am sharing three cards I made with the beautiful 


The first card is a Z fold card


I create all of my own card bases using 300gsm smooth white cardstock.

For the first card I cut a piece of cardstock 10 1/2" x 5 1/4"
I scored it at 2 5/8" and 5 1/4"
The card is folded in half on the 5 1/4" score and the fold at the 2 5/8" score is a valley fold.

All of the patterned paper on this card have had the edges distressed 
with my distressing tool and inked with a black Versacolor Ink cube.

I cut three pieces of Song Blossom
 1 @ 5" square
2 @ 2 3/8" x 5"

These were attached to the three sections you can see when your card is open.

I used my Spellbinders Decorative Labels 8 and Enchanted Florals to cut a panel.
I ran this panel through my Big Shot with Couture Creations 
Flamingos & Hedgehogs embossing folder.

I swiped my black ink cube over the front of this panel to help the design stand out a little more.

 The panel was then attached to the front for the card so it over hangs the 2 5/8" folded line.

I trimmed a piece of scalloped lace and attached that overlapping the left edge of the rectangular panel.

I have painted a piece of chipboard white and added that on top of the lace.
A layer of clear Wink of Stella added a little sparkle to my chipboard.
I am not sure of the name of this chipboard, it looks like a sea grass. I have cut it in half to use.

I have fussy cut images from Natures Romance and Song Blossom
to embellish further. These were added on top of the chipboard.

The sentiment is computer generated, it is matted it onto a piece of Enchanted Florals 
and attached it to the card front with a piece of cardboard behind it.


The second card is an easel card


The card base is the same size as the previous card and scored at the same measurements.

I have also cut a 5 1/4" square piece of the same cardstock.

Fold your card in half at the 5 1/4" score and a mountain fold at the 2 5/8" score line.

Flatten the front of the card base, and with your card sitting right was up,
apply glue to the right hand half of the the front section.

Lay the 5 1/4" square of cardstock directly on top of the cardbase, 
being sure to line up all of the edges.

Now we have our cardbase ready to decorate.

All of the edges of the patterned papers on this card have been distressed
in the same way as the first card.

I cut two 5" squares from Garden Letters and two pieces 2 3/8" x 5" from Natures Romance

One of the 5" squares was attached to the front of the card 
and the other was attached to the inside back panel.

The two smaller pieces were attached to the inside folded section of the card.

I also cut another piece of the Garden letters 4 3/4" square.
I used the reverse side of the paper and attached it to the front of the card

I used a Martha Stewart punch to punch along 
one of the longer sides of a 3 1/2" x 4 3/4" piece of Enchanted Florals 

I cut a piece of the Natures Romance 3" x 4 3/4" 
and punched along one of the longer edges with the same punch.

 I layered these on top of each other lining the left hand edges up with each other 
with the punched edge on the right.

These were then attached to the front of the card.

I used the Couture Creation's Flamingos & Hedgehogs embossing folder 
to emboss a 2 1/4" x 4 3/4" piece of velum and attached that on top of the previous layers,
once again lining up the left hand edges.

A piece of blue and gold braid was attached on top of the panel so it curled around the panel randomly

My main embellishment was fussy cut from Song Blossom and attached to the front of the card with cardboard behind it

I added a light coat of Glossy Accents to he flowers in the image to give it a little shine.


The sentiment is from Uniquely Creative and is matted on a piece of the Enchanted Florals paper.

This was attached to the inside back of the card with a piece of cardboard behind it, this is what holds the card open for display

I added a few drops of Nuvo Drops - Morning Dew 
randomly on the fussy cut image to finish this card off.

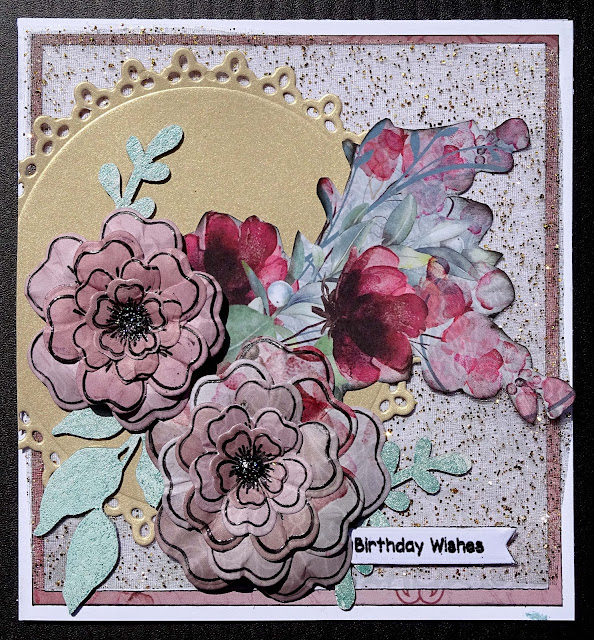
Card 3

This is a 5 1/4" square card


I cut my cardbase 10 1/2" x 5 1/4", scored and folded at 5 1/4" on the long side.

The patterned papers on this card have the edges inked with a black Versa Color ink cube.

The base layer for this card is a 5" piece of Enchanted Florals.

The next layer is a 4 3/4" piece of Natures Romance

I have cut a piece of tulle that has gold particles in it to 5" square and attached that next.

Lifestyles Nesting Doily Circles die and pearlised gold cardstock 
were used to create a doily for my next layer.

I have painted some chipboard leaves from Botanicals and Delicate Branch
with pearlescent water colours.

Before assembling them I used my flower shaping tools to give them some dimension.

I have fussy cut a section from Song Blossom to be the foundation for my embellishment cluster.

The flowers and leaves were added next.
The flowers are mounted on cardboard.

The heat embossed sentiment was added next.

Finally I added Nuvo Glitter Drops - Midnight Sky
to the centre of each of the flowers.

Here is my process video. I hope you enjoy watching it


Thank you for spending part of your day here with me today
Till next time
Stay safe
Hugs
Julie


Tuesday, December 7, 2021

Vintage Christmas Cards

Good morning

Today I am sharing three vintage Christmas cards.

All three cards are 5" square, created using Coredintaions Vanilla Cream cardstock.

Each card also uses Bo Bunny's Father Christmas paper range from 2011.
All of the paper layers have been distressed using my Prima Distressing tool and a black ink cube.


OK let's start with 
Card No. 1


The two background layers are 4 3/4" square and 4 1/2" square

The strip of red patterned paper is 2" x 4" and the cream cardstock is 1 1/2" x 4"

The square patterned papers are attached to the card base with double sided tape

There is a piece of chipboard between the red patterned paper strip and the lace,  
(the lace is a gift from my Mum)
which is attached with liquid glue

Three sparking red poinsettia (a gift from my Mum) are attached down the length of the cream cardstock, 
also attached with liquid glue

The sentiment is stamped using Versafine Onyx Black ink and a stamp from
Kaisercraft's Christmas Edition stamp set.

I die cut the sentiment using a lacy rectangle die, added a piece of chipboard behind it
and attached it to my card front.

The inside of the card


I have cut a piece of red patterned paper 1 1/4" x 4 1/2" and a green piece 3/4" x 4 1/2".
These have been layered onto each other and attached to the left of the inside back panel.

The greeting is stamped using Versafine Onyx Black ink and Kaisercraft's Christmas Greetings stamp set.
This was then covered with clear embossing powder and set using my heat tool.

Card No. 2


Each of the patterned paper layers on this card are matted on a piece of cream cardstock.

Paper sizes are:-
Patterned paper No1. 4 3/4" square
Patterned paper No.2 4 1/4" square 
Cream Cardstock 4 1/2" square and 3 1/4" square.

For the focal point on the front of the card I used an image from the cut-a-part sheet which is 3" square.

Between the cut-a-part image and the 3 1/4" cream cardstock 
I have added a 4" square piece of glitter tulle.

On the inside


I cut "Merry Christmas" from Uniquely Creative's Holly Jolly Christmas 6" paper pack
and  matted it onto a 2 1/2" square piece of patterned paper.

I stamped and heat embossed a Christmas tree from a free stamp set I received with a magazine.
The magazine was Creative Cardmaking.

I added dots of Nuvo Crystal Drops in Autumn Red to the heat embossed tree.

Card No. 3


This card has all of the patterned papers matted on gold mirror card.

The patterned papers measure 4 3/4" square, 4 1/4" square and 3 1/8" x 3 5/8"

The gold card is 4 1/2" square and 3 1/2" x 3 5/8"

on the smallest piece of patterned paper I have put Decofoil Transfer Gel Duo
through a Christmas tree stencil.
When the gel was dry I added gold foil using my brayer.

Inside the card


I cut a piece of patterned paper 4 1/2" square and attached it to the inside of the card.

I used another "free with magazine" stamp to stamp and heat emboss
a sentiment to the patterned paper.
The magazine was Australian Papercraft Essentials

Here is my process video
I hope you will check it out


Well that's it for today
Thank you for spending part of your day here with me today
Till next time
Stay safe
Hugs
Julie


Wednesday, December 1, 2021

Design Team Project for Mystical Scrapbooks December Challenge

Hi there
Thanks for joining me today.

This project is created for the December challenge at Mystical Scrapbooks.

There are two challenge for the month and this particular challenge
 is to create a Christmas project using non-traditional Christmas colours.
This can be a layout, cards, mini album or any other project you would like to make.

I have created a mini album to hold our photos of Christmas Day.


I saw an album created in this fashion by Heidi Swamp several years ago.
She used her pre-printed cards but they are smaller than I wanted my album to be.
I wanted my album to be able to hold 6" x 4" photos without any trimming.
If you use her pre-printed cards you don't need to add the patterned paper.

You can see how I created an album using pre-printed cards here
And how I decorated it here


I have used purchased 5" x 7" pre-folded white card bases.

The patterned paper I used for this album is Cocoa Vanilla's Sunkissed, 
a nice bright cheery collection that reflects the lovely warm/hot 
Christmases we have here in Australia

To start I trimmed 10 of the patterned papers to 4 3/4" x 6 3/4"
inked around the edges with my Versacolor black ink cube and 
attached them to both panels on the inside of the card bases.
There is no patterned paper on the outside of the card bases.

To join all of the cards together and create the album I ran 
a row of double sided tape around the two long sided and the bottom short side.

Carefully lay one card on top of the other ensuring you have the cards lined up perfectly.
If they are not lined up exactly your album may be a little wonky.
Do this for all 5 cards.
By doing this you create a pocket between each page of your album.

I then took it to my sewing machine and stitched where
I had applied the tape. This is optional but it does strengthen the album.

I cut two piece of the patterned paper 5" x 7" to cover the front and back of my album.

The spine for the album is a piece of POW Gold Glitter cardstock that I cut to 1 1/2" x 7" 
and folded around the spine of the album. I have attached it to the back and front
 covers using liquid glue. Do not put any glue on the centre section of the spine.


I created a tag to go inside each (4) of these pockets

I cut four pieces of white cardstock 4" x 6 1/4"
I cut four pieces of patterned paper 3 3/4" x 6", inked the edges
and attached them to the cardstock.

Next I stamped a journalling panel onto white cardstock and cut the panel out.
This was then attached to the tag on top of the patterned paper.
This is actually the back of the tag, I have left the front plain so I can attach my photo.

To create a pull tab for the tags I stamped and clear heat embossed the 
Tree and Bauble from Kaisercraft Sparkle stamp set 
onto white cardstock and then fussy cut them out.
I created four of each shape so I could attach then to both the front and back of the tag. 
You will need to choose a symmetric shape for this.

I used liquid glue to attache these as it gives me a little time to make sure they are perfectly lined up.


I have kept the inside of the album pretty plain as I did not want too much bulk.

Each opening has one plain page with a little journalling tab and 
one page with a pocket and a flat, simple embellishment.

The embellishment for the page above came from the Kaisercraft Starry Night Collectables pack


The embellishments for this page came from 
the Wooden Flourish pack from the same collection
I painted the "25" with Kaisercraft Dusty Pink acrylic paint


The banner on this page is from the collectables pack 
and the cut apart is from the paper stack


These embellishments came from a pack I purchased from our local cheap shop.


The tab on the left page is another cut apart from the paper stack 
and the poinsettia (this is a similar die) was die cut from the patterned paper.


To embellish the cover I cut two more of the poinsettias,
painted two Christmas trees from the Wooded Flourish Pack with the same Dusty Pink paint,
the banner is from the Collectables pack and the 
title is cut using Tim Holtz Inside Out Alpha die. 
I have not added the year, I will do that when I use the album.
The centres of the poinsettias are Pops of Colour Glitter Champagne

If you check out my video below you will see the whole process


Thank you for spending part of your day here with me today,
Until next time
Stay safe
Hugs
Julie


Wednesday, November 24, 2021

Christmas Cards using Tulle from Mum

Hi there

Today I am sharing three cards I made using tulle.

I recently visited my Mum and she was having a clean out of some of her crafting stash.
She gave me about a dozen rolls of assorted tulle and many assorted braids.

When I got home I decided that instead of putting them straight into my storage 
I would use some of them and that is how the idea for using
 the tulle on these cards came about.

As I have not finished my Christmas cards for this year I made three Christmas cards.


To attach the tulle to the cardstock panels for all of these cards I used Art Glitter Glue.
I applied a line of glue around the back edge of the panel and then folded the tulle around the panel and into the glue. I then put an acrylic block on top of the panel while the glue dried.

All of the card bases are cut from 240gsm smooth white cardstock.
I have cut the cardstock 10" x 5", scored (using my Score Board) at 5" on the long side and folded to create a 5" square card.
I always use my teflon bone folder to create beautiful crisp folds on my cards without any shine.

All of the patterned papers are from Kaisercraft's Sparkle 6.5" paper pad.
I also used some of the Sparkle Collectables to decorate my cards.

The edges of each of the patterned papers have been inked using my Versa Color Black ink cube.

Card No. 1


The tulle on this card is bright pink.
The white cardstock panel that is covered with the tulle is 4 3/4" square.

The Rose Gold Foiled patterned paper is 2 1/2" x 4 3/4"

Two pieces of black cardstock that measure 3/4" x 4 3/4" are attached to the top and bottom of the patterned paper panel so approximately 1/4" of the black is showing beyond the panel.

To create the poinsettia I chose a lightly patterned paper from the pad, 
I used my Heartfelt Creations Sparkling Poinsettia stamp, 
This was then set using my heat tool.

I used my spring loaded scissors to fussy cut all four layers of the flower.

To give the flower some shape I used my flower shaping tool 
and a stubbie holder I have cut open to press into the back
 of each of the petals on all four layers.

I used a dob of liquid glue in the centre of each layer and off set the petals as I created the flower.

The sentiment for the card came from the Collectables pack. 
It is attached to the card with a layer of chipboard behind it.

To add a little sparkle to the card I added a few sequins down the left hand edge
 and a circle of Pops of Colour Glitter Champagne to the centre of the flower.

Card No. 2


The tulle I used on this card is gold and it has small gold sequins attached to it
 so I wanted to keep this card quite simple.

The white cardstock panel that is covered with tulle is 4" x 5"

A strip of gold mirror card that is 3/4" x 5" was attached to the top and bottom
 of the tulle panel with about 1/4" of gold showing.

This was then attached to the card front leaving about 1/4" at the top and bottom.

I used my Memory Box Snowflake Ornament Die and my Big Shot to cut two baubles
 from gold mirror card that I had attached double sided adhesive sheet to the back of,
When I cut the baubles I decided to leave all of the pieces together 
as the detail stood out beautifully and the solid gold baubles were more impactful.

I used liquid glue to attach a fine gold thread to the tulle panel.
 The baubles were attached in the same way.

The sentiment is from a sheet of sentiments I printed.
I have matted that on some of the gold mirror card and attached it to the card front
 with a piece of chipboard behind it.

Card No. 3


This card has three patterned papers on it

The light pink paper is 4 3/4" square, 
the dark paper is 4 1/2" square and 
the foiled panel is 1 1/2" x 4 1/2".

The tulle on this card is white with a silver glimmer to it. 
I have covered the small panel with the tulle.

I added a layer of chipboard behind the panel and then wrapped
 a piece of pink and silver braid around it, tying it into a knot.

I used the same tulle to tie a bow and attached that above the braid.

The sentiment for this card also comes from the Collectable pack. 
It is a bauble shape and I have tied a piece of the tulle through the hole at the top
 and attached that to the panel with a piece of chipboard behind it.

Here is my process video


I hope you have time to check my video out.

Thank you for spending part of your day here with me today
Till next time
Stay safe
Hugs
Julie


Wednesday, October 20, 2021

Three Christmas Cards with Christmas trees

Good morning

I have three cards to show you today and they all have Christmas trees as their focal point


All of my card bases are made using 240gsm white cardstock and are 5 1/4" square.

All of the patterned papers are from BoBunny's Father Christmas paper range.

Card No. 1


I have used Kaisercraft's Merry Christmas stamp set to stamp and heat emboss 
baubles onto deep red cardstock using my embossing buddy, 
Versamark ink and Fine Gold Embossing powder.
 
I trimmed the cardstock to 5" square, 
I will use this as the background layer of my card.

A four layer tree die was used to cut this tree from the patterned paper.
The tree was assembled on the red panel using Art Glitter glue

I used gold mirror card to die cut the base of the Christmas tree
 and a 3/8" star punch to create the star for the top of the tree.

The greeting is from Uniquely Creative and is matted on the 
same mirror card as I used for the star and base. 
It is attached to the card front with a scrap piece of chipboard behind it.

I added dots of Pops of Colour - Glittering Champagne, 
randomly on the tree to look like Christmas baubles

I had a piece of the red heat embossed cardstock left over so I trimmed it
 to 1" x 5 1/4" and attached it to the inside left of the card

Card No. 2


A white and gold card this time. This colour combination always looks elegant I think.

I have cut a piece of the gold mirror card 4 3/4" square
A piece of white cardstock measuring 4 1/4" has been embossed using 
Sizzix 3D Texture Impressions - Mosaic Gems  embossing folder.
I had originally wanted this layer to be larger but this is the maximum size 
that this embossing folder can emboss as a square.

I cut a piece of white cardstock 4 3/4" x 2 1/2" and wrapped some gold ribbon around it 
securing it in place with double sided tape and a knot.
Scrap chipboard was added to the back of this panel before it was added to the card front.

I die cut two Christmas trees from white cardstock, backed them with gold mirror card
 and attached them to the ribbon panel

The sentiment is once again from Uniquely Creative.
It has been matted on the gold mirror card and attached to the card front using foam tape.

Card No. 3


I have used my Tim Holtz Distressing tool and a black ink cube to distress all of the edges of all of the papers used on this card.

I have cut patterned papers to 5 1/4" square, 4 3/4" square and 1 3/4" x 4 3/4"
I also cut some gold mirror card to 5" square and 2" x 5"

The square patterned paper and gold cardstock were layered onto the front of the card base.

I had the white frame sitting on my dest for some time so decided to use it on this card.

I traced around the inside and outside of the frame onto a piece of white cardstock.
Using strips of patterned paper I created the Christmas tree, 
ensuring the tree fitted inside the frame tracing.

The frame was attached to the white cardstock that had my paper pieced tree on it,
 this was then attached to the card front

I used my Semco Pearlised Watercolour palette to colour the background around the tree.

The frame was given a good coat of Wink of Stella White.

The sentiment was cut from gold mirror card using 
Elizabeth Craft Designs 745 Merry Christmas die 
and attached to the Christmas tree.

The rectangular patterned paper and mirror card were
 layered onto each other and attached to the inside right of the card.

You can watch my process video below.


Thank you for spending part of your day here with me today

Till next time
Stay safe
Hugs
Julie


Wednesday, October 6, 2021

Curtain Lace cards

Good morning

Today I want to show you what I made with the curtain lace I coloured in this video

All of these cards use a purchased pale pink satin card base that measure 5 7/8" square

Each of these cards use Kaisercraft's Secret Garden patterned papers.


Card No. 1


I have covered the front of the whole card base with the curtain lace.
To do this I used Satin Mod Podge

I cut a piece of gold cardstock 4" x 5 7/8"
Pink checked paper 2 @ 1" x 5 7/8"
Grey patterned paper 2 @ 1" x 5 7/8"
Floral patterned paper 2 1/4" x 5 7/8"

I attached the patterned papers to the gold cardstock to create a panel for the front of the card.


I created two flowers using pale pink velum and my Couture Creations CO724161 flower die.
When I placed them on the front of the card they faded into the background.
I used the same die and white cardstock, to create two flowers. 
I inked the edges of the cardstock with a gold ink cube to help the flowers stand out
and tie them to the gold already on the card.
A little Nuvo Glitter Drops in White Blizzard added to the centre of each flower
finished the flowers off and added a little sparkle to the card.

I die cut the sentiment four times from white cardstock and once from gold cardstock
These were attached to each other with the gold layer on top.
The sentiment was then added to the centre right of the card.

Card No. 2


I chose three papers from the pad and trimmed them to 
5 1/2" square, 5 1/4" square and 5" square.

The edges of each piece was inked with a black ink cube and attached to the card base, 
largest layer on the bottom working up to the smallest layer.

I cut a piece of white cardstock 5 1/2" x 3" and attached some of the 
white (uncoloured) curtain lace to it using Mod Podge once again.

A strip of burgundy patterned paper was cut 1" by 5 1/2" and a 
strip of gold cardstock was added to the 
top and bottom of this strip, with approximately 1/4" showing. 
This was added to the card front with a layer of chipboard behind it.

I created another of the pink velum flowers so I had three to place across the centre of the card.

The centre of the flowers is a little squirt of Pops of Colour - Glitter - Champagne


To create the sentiment I stamped "It's Your Day" from the 

I trimmed the sentiment and matted it onto some of the 
same gold cardstock that I have used on the card already.
This was attached to the card with a strip of chipboard behind it
so it sits flat against the lace layer.

Card No. 3


This is perhaps the simplest of the three cards.

I cut a piece of patterned gold cardstock to 5 5/8" square
and a piece of white cardstock 5 3/8" square.

I ran the white cardstock through my Big Shot
 with a rose patterned embossing folder
I think it is a Kaisercraft folder but not sure.

As the embossing folder was not big enough to cover the 
whole piece of cardstock I trimmed it down to 4 7/8" square.

I must put some square embossing folders on my shopping list.

I cut 4 circles from the coloured curtain lace, in decreasing sizes.
When I layered them on top of each other I lost the definition of each circle
so I cut circles from the pale pink velum to match the size of the lace circles, 
inked the edges of the velum with a black ink cube and 
attached the lace to the velum using Art Glitter glue.
Next I attached the four circles on top of each other to create my flower. 
Three black crystals added to the centre of the flower 
bring in a black element to go with the sentiment.
The finished flower is approximately 3 1/4" in diameter.

The flower is attached to the bottom left of the card front.


The sentiment for this card was cut using 
Uniquely Creative's Brush Scrip Sentiments die

Here is my process video

I hope you enjoy watching both my videos and try this technique for yourself.
It is very easy and lots of fun and I still have the cardstock I created to use on another project..

Thank you for spending part of your day here with me today

Till next time
Stay safe
Hugs
Julie 
Mod Podge Matte

https://shrsl.com/36tip

Gems Range

https://shrsl.com/36tiw

Nuvo Drops Range

https://shrsl.com/36tiu

Neenah Solar White A4 25 Pack

https://shrsl.com/36tit

Bazzil 12 x 12 Black Cardstock

https://shrsl.com/36tiz