Showing posts with label gems. Show all posts

Saturday, March 5, 2022

Five hand made flowers using dies

Good morning

Today I have a quick post to share with you a video I have posted
 showing how I used five assorted dies to create five flowers. 

This is the second video I have posted showing how to create beautiful flowers using dies.
You can find the first one here.

These are the flowers I created in today's video


I hope you enjoy my video.

If you do I would love it if you would click the like button 
and subscribe to my channel if you have not already


Thank you for spending part of your day here with me today
Until next time
Stay safe
Hugs
Julie


Sunday, February 6, 2022

Denise Boddey DT album flip through

 Good morning

Today I want to share a mini album I created using Denise Boddey Designs Elegance patterned papers.

The album started life as an accordion album.
I altered the album by adding a spine and assorted flaps, pockets and a hand made envelope.

You can see that video here

All of the papers have had the edges distressed using my distressing tool 
and then inked with a VersaColor black ink cube.

Each page has a top opening pocket with a photo mat.

I have also used some velum, made some flowers using Craft Barn Stamp/Die set 
and created the tags for the album using Uniquely Creatives Tags Tops & Tails.

Lace from my stash helps to decorate the front of the album.

Here are some photos

Album Closed

Album Open


Closeup of Front Cover


Front Cover


Page 1


Page 2


Page 3


Page 4


Page 5


Page 6


Page 7


Page 8


Back Cover


The papers I have used are:-

Grace


Style


Chic


After the Rain


Refined


and the chipboard is


Delicate Branch


Here is my process video. I hope you enjoy it.


Thank you for spending part of your day here with me today


Till next time

Stay Safe

Hugs

Julie


Saturday, January 1, 2022

January Challenge at Mystical Scrapbooks

Good morning and Happy New Year to you.

My post today is to share my Design Team layout for January's challenge at Mystical Scrapbooks

The theme for the month is Techniques and the highlighted product is ribbon & twine.
The ribbons and twine will be on sale for the month so don't forget to check them out.

The challenge that I have set is to use the "Smooshing" technique on your layout and to incorporate a ribbon or twine bow.

Here is my layout


There are eight photos and they are each 3" square.

I have used Distress and Distress Oxide inks for my smooching.
The paper I have used for my background is Bee Arty - Love & Grace - Adele

The inks I have used are 
Distress Oxides Speckled Egg & Salty Ocean

If you are unsure of how to do the "Smooshing" technique check out my process video below.
It is very simple and lots of fun.

I also added random stamping on my background using Versafine Onyx Black ink

I have used Bee Arty Love & Grace - Portia patterned paper and white cardstock
to die cut an assortment of flowers.

The dies I used are
Uniquely Creatives Little Leaves
Couture Creations CO724161
Cheery Lyn B311 Chrysanthimum Strip
and one other die that I do not know the name of.


I inked the edges of the flower layers, shaped them with my flower shaping tools 
and assembled them using my Art Glitter Glue.

I filed around each of the photos with an emery board before attaching them to my background.

Next the flower embellishments were attached

A Bakers Twine bow sits amongst the left hand floral cluster


The title was cut from black cardstock using Kaisercraft's DD700 Alphabet Upper Case Die,
attached to the right hand side of the layout and given a coat of Glossy Accents

To finish the layout off I added a scribbly boarder of slightly 
watered down black acrylic paint in my 

Here is my process video so you can see how I created this layout, including the "smooshing" on the background


Thank you for spending part of your day here with me today

Till next time
Stay safe
Hugs
Julie


Wednesday, October 6, 2021

Curtain Lace cards

Good morning

Today I want to show you what I made with the curtain lace I coloured in this video

All of these cards use a purchased pale pink satin card base that measure 5 7/8" square

Each of these cards use Kaisercraft's Secret Garden patterned papers.


Card No. 1


I have covered the front of the whole card base with the curtain lace.
To do this I used Satin Mod Podge

I cut a piece of gold cardstock 4" x 5 7/8"
Pink checked paper 2 @ 1" x 5 7/8"
Grey patterned paper 2 @ 1" x 5 7/8"
Floral patterned paper 2 1/4" x 5 7/8"

I attached the patterned papers to the gold cardstock to create a panel for the front of the card.


I created two flowers using pale pink velum and my Couture Creations CO724161 flower die.
When I placed them on the front of the card they faded into the background.
I used the same die and white cardstock, to create two flowers. 
I inked the edges of the cardstock with a gold ink cube to help the flowers stand out
and tie them to the gold already on the card.
A little Nuvo Glitter Drops in White Blizzard added to the centre of each flower
finished the flowers off and added a little sparkle to the card.

I die cut the sentiment four times from white cardstock and once from gold cardstock
These were attached to each other with the gold layer on top.
The sentiment was then added to the centre right of the card.

Card No. 2


I chose three papers from the pad and trimmed them to 
5 1/2" square, 5 1/4" square and 5" square.

The edges of each piece was inked with a black ink cube and attached to the card base, 
largest layer on the bottom working up to the smallest layer.

I cut a piece of white cardstock 5 1/2" x 3" and attached some of the 
white (uncoloured) curtain lace to it using Mod Podge once again.

A strip of burgundy patterned paper was cut 1" by 5 1/2" and a 
strip of gold cardstock was added to the 
top and bottom of this strip, with approximately 1/4" showing. 
This was added to the card front with a layer of chipboard behind it.

I created another of the pink velum flowers so I had three to place across the centre of the card.

The centre of the flowers is a little squirt of Pops of Colour - Glitter - Champagne


To create the sentiment I stamped "It's Your Day" from the 

I trimmed the sentiment and matted it onto some of the 
same gold cardstock that I have used on the card already.
This was attached to the card with a strip of chipboard behind it
so it sits flat against the lace layer.

Card No. 3


This is perhaps the simplest of the three cards.

I cut a piece of patterned gold cardstock to 5 5/8" square
and a piece of white cardstock 5 3/8" square.

I ran the white cardstock through my Big Shot
 with a rose patterned embossing folder
I think it is a Kaisercraft folder but not sure.

As the embossing folder was not big enough to cover the 
whole piece of cardstock I trimmed it down to 4 7/8" square.

I must put some square embossing folders on my shopping list.

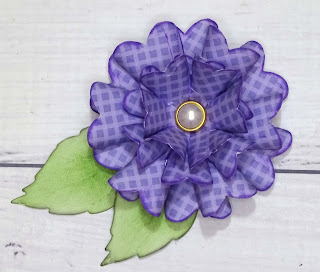
I cut 4 circles from the coloured curtain lace, in decreasing sizes.
When I layered them on top of each other I lost the definition of each circle
so I cut circles from the pale pink velum to match the size of the lace circles, 
inked the edges of the velum with a black ink cube and 
attached the lace to the velum using Art Glitter glue.
Next I attached the four circles on top of each other to create my flower. 
Three black crystals added to the centre of the flower 
bring in a black element to go with the sentiment.
The finished flower is approximately 3 1/4" in diameter.

The flower is attached to the bottom left of the card front.


The sentiment for this card was cut using 
Uniquely Creative's Brush Scrip Sentiments die

Here is my process video

I hope you enjoy watching both my videos and try this technique for yourself.
It is very easy and lots of fun and I still have the cardstock I created to use on another project..

Thank you for spending part of your day here with me today

Till next time
Stay safe
Hugs
Julie 

Mod Podge Matte

https://shrsl.com/36tip

Gems Range

https://shrsl.com/36tiw

Nuvo Drops Range

https://shrsl.com/36tiu

Neenah Solar White A4 25 Pack

https://shrsl.com/36tit

Bazzil 12 x 12 Black Cardstock

https://shrsl.com/36tiz

Monday, September 13, 2021

Tattered Florals Flower Tutorial

Good morning

Today I have got a quick video tutorial showing how I created
a beautiful and dimensional flower using the Tim Holtz Tattered Floral die


I have used Kaisercraft's Curiosity 6.5" paper pad

Here is the video.
Hope you enjoy it


Thank you for spending part of your day here with me today

Till next time
Stay safe
Hugs
Julie

Friday, August 6, 2021

KS4U August Mini Album

Good morning

A quick post today to share with you the flip through video of the mini album I made using my DT supplies from KS4U.


Flower alert - there are a lot of hand made flowers in this album.

I have used Basic Grey's Indian Summer 6" paper pad to decorate this album

The flowers were made using Cheery Lyn B311 Chrysanthemum Strip

and Couture Creations CO724161 Flower dies. 

The leaves were cut using Uniquely Creative's Little Leaves die.

The chipboard was given a coat of White acrylic paint and then sprayed with 

Docraft's Spritzing Ink in Gold

Here is my video

Hope you enjoy watching it.


Thank you for spending part of your day here with me today

Till next time
Stay safe
Hugs
Julie