Showing posts with label Bee Arty. Show all posts

Monday, August 1, 2022

Mystical Scrapbooks August Challenge

Hi there

Today's layout is for the August challenge at Mystical Scrapbooks.

The theme for this month is Sketches and the featured product is "all things sparkle".

You will find the challenge here
and all of the sparkle products are on sale here.

This is the sketch I have used for this layout.
It is from PageMaps


and this is my layout


I have made a couple of slight changes. 
I have used one photo instead of two.
My embellishments are on a diagonal from top right to bottom left, 
the sketch has the embellishments on the right hand side of the layout.
My title is under the photo, the sketch has the title above the photo.

I have used a paper from the Bee Arty - Bee The Sunshine range
this paper is Painted Honeycomb.

I have used an assortment of Washi Tapes to create the strips across the layout 
and the small cluster in the bottom left of the page.

 I have covered the "all things sparkle" by having lots of sparkle in the washis.

I added a row of lace to the strips for a little added texture.

These were scattered diagonally across my layout.
A little more bling with some tiny pink gems amongst the scatter.


were painted white and added to the layout.

I die cut the title from black cardstock using Uniquely Creative's 
Small Lower Case Alpha dies
and Die-Namics Little Numbers die.

A double scribbly border using my fountain pen finishes this layout off.

Here is my process video
I hope you enjoy watching it.


As always, thank you for spend part of your day here with me today.

Till next time
Stay safe
Hugs
Julie


Friday, July 15, 2022

July Cyber Crop at Mystical Scrapbooks

Good morning

I have got a layout to share today.
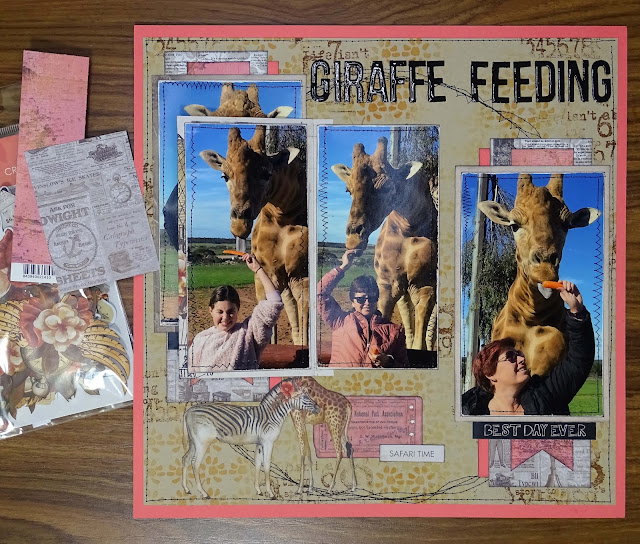
I created this layout for the Cyber Crop at Mystical Scrapbooks.
You will find the Cyber Crop here

There are three challenges in this Crop and this layout if for the challenge 
that requires you to use a flip on your layout.

You can see what I mean in the photos below.

The centre photo opens out to reveal two more photos underneath.


I used papers from the Uniquely Creative Steampunk Safari collection for this layout.

To create the background I used Scattered Straw and Rusty Hinge Distress Inks through 


I have two photos measuring 3 1/2" x 6" and three measuring 3" x 6".
The smaller photos are in the flip section of my layout.
I used Steampunk Safari - Technical paper to matt the photos and to make the flip.

I used Uniquely Creative's Steampunk Safari - Awesome and Basic Grey's Green at Heart - Kermit papers behind the two outside photos along with a piece of the same cardstock I used to matt the whole layout.

I have sewn around everything with my sewing machine and black thread, 
including a circle in the middle of the layout.

To embellish the layout I used some items from the Steampunk Safari Creative Cuts 
and some fussy cut items from Steampunk Safari - Unique patterned paper

I cut the title from black cardstock using my Kaisercraft DD700 Alphabet Upper Case die.
I added a coat of Glossy Accents.

My process video is below.
In the video I also show you how I add my layout to a page protector 
in my album so the flip can be opened.


Don't forget to pop over to Mystical Scrapbook and check out the Cyber Crop

Thanks for being here today
Till next time
Stay safe
Hugs
Julie

Saturday, January 1, 2022

January Challenge at Mystical Scrapbooks

Good morning and Happy New Year to you.

My post today is to share my Design Team layout for January's challenge at Mystical Scrapbooks

The theme for the month is Techniques and the highlighted product is ribbon & twine.
The ribbons and twine will be on sale for the month so don't forget to check them out.

The challenge that I have set is to use the "Smooshing" technique on your layout and to incorporate a ribbon or twine bow.

Here is my layout


There are eight photos and they are each 3" square.

I have used Distress and Distress Oxide inks for my smooching.
The paper I have used for my background is Bee Arty - Love & Grace - Adele

The inks I have used are 
Distress Oxides Speckled Egg & Salty Ocean

If you are unsure of how to do the "Smooshing" technique check out my process video below.
It is very simple and lots of fun.

I also added random stamping on my background using Versafine Onyx Black ink

I have used Bee Arty Love & Grace - Portia patterned paper and white cardstock
to die cut an assortment of flowers.

The dies I used are
Uniquely Creatives Little Leaves
Couture Creations CO724161
Cheery Lyn B311 Chrysanthimum Strip
and one other die that I do not know the name of.


I inked the edges of the flower layers, shaped them with my flower shaping tools 
and assembled them using my Art Glitter Glue.

I filed around each of the photos with an emery board before attaching them to my background.

Next the flower embellishments were attached

A Bakers Twine bow sits amongst the left hand floral cluster


The title was cut from black cardstock using Kaisercraft's DD700 Alphabet Upper Case Die,
attached to the right hand side of the layout and given a coat of Glossy Accents

To finish the layout off I added a scribbly boarder of slightly 
watered down black acrylic paint in my 

Here is my process video so you can see how I created this layout, including the "smooshing" on the background


Thank you for spending part of your day here with me today

Till next time
Stay safe
Hugs
Julie