Showing posts with label glitter. Show all posts

Sunday, May 29, 2022

Retro TV Program Competition at Mystical Scrapbooks

Good morning

Today's layout is for week 5 of the Retro TV Program competition over at Mystical Scrapbooks.
You will find the competition here.

The program for this week is Friends.
The colour palette is rainbow, the required item is a Coffee Cup / Champagne Glass, 
you must use glitter on your page and the bonus item from the optional kit is a fabric heart.

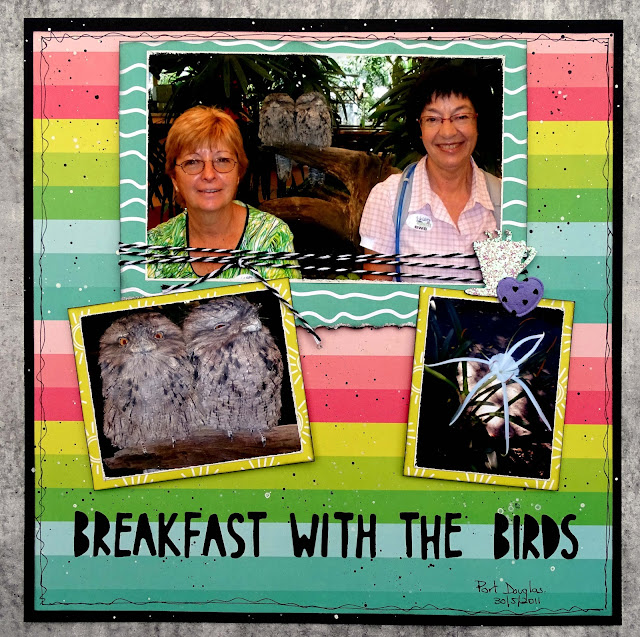
Here is my layout


As you can see I have got the rainbow of colours as the background of my layout.
I used Simple Stories - Hello Summer papers for this layout.

I gutted a piece of black cardstock leaving a 1" frame.
My 11 1/2" square piece of Life is Good was attached to the frame using double sided tape.

I watered down both black and white acrylic paints and used my fan brush to create splatters all over my background.

I trimmed my 7" x 5" main photo to 7" x 4 1/2" and filed around the edge 
of each of the three photos with an emery board to add a fine white border.

I cut a piece of Oh Happy Day 8" x 6" and tore along one of the 8" edges.
After inking around the edges I attached my large photo to it.

I wrapped some black & white Twine around my photo three times and tied a knot at the front.

The two smaller photos were matted onto Catching Rays with a 3/16" border on each side.

I added cardboard to the back of each of the photos and attached them to the layout.

I painted my coffee cup chipboard with white acrylic paint. 
When this was dry I added a liberal coat of Art Glitter glue and pressed 
Dress my Craft Rainbow Glitter onto it, making sure it had a nice thick coat.

I added the coffee cup and the fabric heart to the layout using Art Glitter glue

To create the title I used Sizzix 662667 Alphabet die and black cardstock.
I attached the title using Art Glitter glue and my reverse tweezers

To finish the layout off I used my fountain pen to draw a double scribbly border around the page.


You can see my process video here.
I hope you enjoy watching it


Thank you for spending part of your day here with me today

Till next time
Stay safe
Hugs
Julie


Wednesday, March 16, 2022

Three inking techniques

Good morning.

Before I start my post today I would like to ask you to do something for me.
I spend a lot of time writing these posts and I wonder if anyone reads them. 

If you have visited my blog today could you please leave me a comment, even if it is just "Hi Julie"
Depending on the number of comments I receive to this post 
I will decide whether I will continue posting on my blog.

So please, if you visit my blog and enjoy reading what I post please leave me a short comment.

Now on to today's post.

I recently bought some new Distress Inks and realised I didn't use my inks often enough,
so today I am sharing three techniques using Distress/Oxide Inks.
I have mainly Distress Inks with a few Distress Oxides thrown in.

I made three cards


Each of the cards are a different size.

Card No. 1

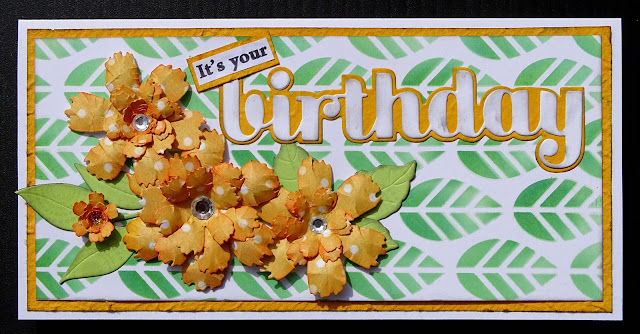
This is a slimline card measuring 8" x 4" and fits into a standard DL envelope


I have cut 300gsm white cardstock to 8" x 8" and folded it in half. 

I used Cracked Pistachio Distress Oxide and Mowed Lawn Distress ink, 
 with a Hero Arts Blending brush, to apply colour through A Little Birdie leaf stencil.

I trimmed a piece of textured yellow cardstock to 3 3/4" x 7 3/4" and attached that to my card front.

Next I trimmed my inked panel to 3 1/2" x 7 1/2" and added that on top of the yellow cardstock.

To decorate the card I used some of the flowers I created in this video

I die cut the sentiment from white cardstock and the shadow from the yellow cardstock,
inked the edges and attached it to the front of the card about 2/3rds of the way up.


I printed the rest of the greeting, trimmed it to size, layered it onto a piece of the yellow cardstock and attached it so it was slanted and slightly over lapping the b of "birthday"

I also used the same stencil and some Squeezed Lemonade Distress Ink 
on the inside of the card.

Card No. 2


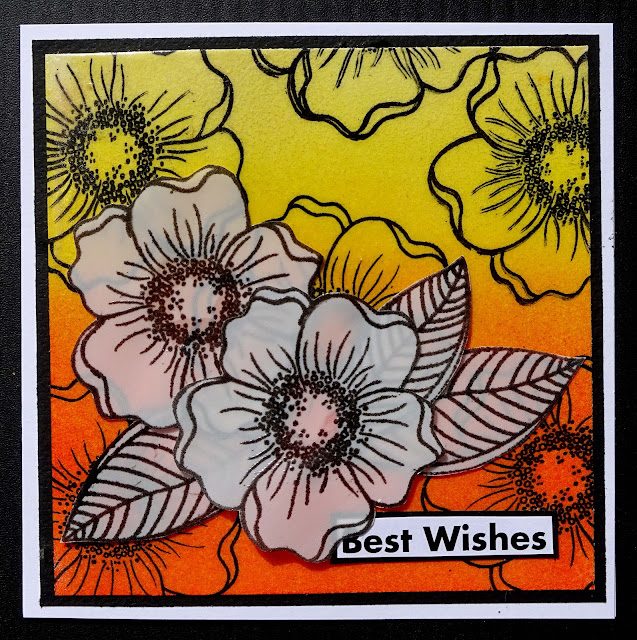
This card is 5 1/4" square

I started with a piece of smooth white cardstock 5" square and blended Squeezed Lemonade, Mustard Seed, Spiced Marmalade and Ripe Persimmon Distress inks, starting with the lightest colour and 
working my way down to the darkest. I used a domed foam blending tool for this.

 to stamp all over the background using Versafine Onyx Black ink.

I added clear embossing powder and as the Distress Inks were still wet 
the embossing powder clung to the whole background. 
I had not planned on doing this but I have to say I am pretty happy with the results.
I gave it 3 or 4 coats of the clear embossing powder to get a nice high gloss.

I trimmed a piece of black cardstock to 5" square and 
the stamped panel to 4 3/4" square and layered them onto the card front.

I did not want to completely cover the pretty background so I stamped a 
couple of the same flowers and three leaves from a Paper Artsy stamp
onto some Hero Arts velum. I stamped with Versafine Onyx Black Ink


I fussy cut the flowers out and used Art Glitter glue to attach the velum, 
applying the glue behind the embossing.

The sentiment came from a little pot of sentiments I keep on my desk. 
They are leftovers from kits, paper packs or excess stamping/heat embossing.
I matted the sentiment onto some black cardstock and added it to the bottom right of the card.

Card No. 3


Our final card for today is 4 1/4" x 6"

I am going to use my inks as watercolours for this card.


I used my water brush to apply the colour but you could use a normal brush if you don't have one.

I used two colours on each area.

For the leaves I used Cracked Pistachio Distress Oxide and Mowed Lawn Distress Ink

For the yellow flower I used Squeezed Lemonade and Mustard Seed

The orange flower is Spiced Marmalade and Ripe Persimmon

And the red flower is Candied Apple and Festive Berries.

You can see how I applied the ink and shading in the video below


I cut some Gold Mirri Card to 4' x 5 3/4" and trimmed my flower panel to 3 3/4" x 5 1/2" 
and layered them onto the front of the card base

The sentiment is from the same place as the previous one and is gold heat embossed.
I matted it onto a piece of the gold mirri card and attached it to the card front 
with a piece of scrap cardboard behind it.

A final touch to this card was to add some gold fine glitter to the centres of the flowers.

So there we have my three cards for today.
I hope you have enjoyed reading about them and I hope you will leave me a comment.

Here is the process vide.
Have fun watching it


Thank you for spending part of your day here with me today
Till next time
Stay safe
Hugs
Julie
Wednesday, February 16, 2022

February inspirational post for Mystical Scrapbooks

Good morning

Today my post is about using chipboard on cards.

The feature product this month at Mystical Scrapbooks is chipboard so I decided to remind myself and you that chipboard is great for cards.


I cut pink cardstock to 10 1/2" x 5 1/4", scored at 5 1/4" on the 10 1/2" side.
This makes a 5 1/4" card

The papers I used for these cards is Couture Creations Peaceful Peonies.

The beautiful lace is from my Mum.

For the top card I cut Patterned paper No. 10 to 5" square and 4 strips 1" x 5"
I distressed the edges of all of the patterned paper 
and then inked the edge using my VersaColor black ink cube.

I attached the 5" square using Art Glitter glue
and the 1" strips were attached with foam squares.


I used my hot glue gun to attach the lace about 2/3rds of the way up the card front.

I fussy cut several flowers from Patterned Paper No 6.

I inked the edges of the flowers and attached them to the card front.

A 4 1/4" x 1" strip that had been distressed and inked is attached to the card front, 
about 1/3rd of the way up from the bottom. This is where I will put the greeting

The chipboard I used on this card is from the "Around the World in 8 weeks" 
challenge that was held by Mystical Scrapbooks last year

I sprayed it with white undercoat and then covered it with gold ink.

The greeting was stamped using LDRS Happy Birthday Stack 
and die cut using LDRS Sentiment Stack die.

I stamped it with Versafine Onyx Black Ink and heat embossed with clear embossing powder.

Final step was to add a few drops of Spun Sugar Distress Stickles


Card No. 2


The papers for this card are Patterned Paper No 1.

I cut a 5" square piece and a 2" x 5" piece.

I cut 2 pieces 1/2" x 5" and attached one to each of the long edges.

I attached the lace vertically, approximately the middle of the card.

I added some fun foam to the back of the strip and then attached it to the front of the card
so it slightly overlapped the edge of the lace.

I then attached some of the fussy cut flowers to the panel.


The chipboard for this card is from Memory Maze - Wire Butterfly Set.
I added a coat of Nuvo Drops - White Blizzard 
to the undercoated chipboard before attaching it to the card.

The sentiment is a Rub On (from Kaisercraft I think) and is attached to the card using foam squares.

While the Nuvo Drops were still wet I sprinkled Spellbinders Sparkle Dust Glitter
over it and then tipped the excess off.

Once again I added a few dots of Spun Sugar Distress Stickles randomly on the card front.

You can see my process video here


Thank you for spending part of your day here with me today

Till next time
Stay safe
Hugs
Julie

Monday, November 29, 2021

Layout for Mystical Scrapbooks

Good morning, good morning

Today I am sharing a layout I created for Mystical Scrapbooks. 
The theme for November is to scrap lift a favourite layout. 
This is my second layout for this month. 

Here is my layout


and this is the layout I have lifted.
It is by Mandy Melville from November 2016.
I loved the simplicity of the layout
You will find her blog post here.


I turned the layout on its side as my photo was portrait orientation
while the one on Mandy's layout was landscape orientation.

I used Uniquely Creatives Days of December paper collection for this layout.

As the photo is of my Grand-Daughter in one of her theatrical performances
I wanted to have lots of sparkle on this layout.
The photo started life 6" x 6" but I trimmed it down to 3 3/4" x 6"

I used a sheet of American Crafts POW Gold Glitter Paper as my background.
I did not want to waste this beautiful paper so I cut a 1" frame from it. 
This gives me the centre section to use on other parts of the layout. 

I trimmed a piece of white cardstock to 11 1/2" square to use as my background.

To add some interest to my background I used 
Nuvo Glitter Drops- White Blizzard, through TCW Stencil - Two Hearts
The Nuvo Drops do not stand out from the white cardstock very much
but they do add lots of texture and sparkle.

Next I used my Prima Stitched Rectangle stamp and Versafine Onyx Black ink
 to stamp some straight stitched lines randomly on to the background.


I used Hero Arts Infinity Rectangles die with my Big Shot to cut six assorted sized rectangles from the gold glitter card.

I cut "The Season" patterned paper to 6 1/2" x 5" and 3/4" x 2" and
"Good Cheer" patterned paper to 4 1/2" x 4" and 3/4" x 2 1/2"
I cut a fish tail in one of the narrow ends of the two smallest pieces of patterned paper.

I inked the edges of all of the patterned and glitter card.


I filed the edges of my photo with an emery board and matted it onto some black cardstock.
Before adding it to the patterned paper cluster, 
I attached some chipboard to the back of the photo mat.

For my title I used Dusty Attic Picture Perfect chipboard.
I used my VersaMark Embossing Ink to heat embossed the chipboard
 with gold on the top and black on the bottom.
You can see how I did this in the process video below.


Now that I have all of my elements ready I attached them to my layout background

I used my Uniball Mico black pen to draw a double scribbly border around my page

As a final sparkly touch I sprinkled 28 Lilac Lane gold sequins onto the layout and attached them using liquid glue and my Silhouette Pick Me Up tool.

Here is my process video
I hope you enjoy watching it.


Thank you for spending part of your day here with me today.

Till next time
Stay safe
Hugs
Julie


Thursday, October 28, 2021

All that Sparkles Art Journal page

Good morning, good morning

In today's post I would like to show you a very simple art journal page I created.

I haven't used my Gelatos for ages and wanted to get them out.
I love how creamy they are and how easy they are to apply.


I used an 8 3/4" x 8 1/4" sheet of 216gsm watercolour paper. 
I punch four holes down one of the 8 1/4" edges 
and hold my pages together using jump rings.

I only use one side of the paper and on the back I write the products I have used on the page.

I have covered the whole page with Tim Holtz Tissue Wrap - Melange, 
which I have attached using Satin Mod Podge
I ran my Brayer over the tissue to ensure it is well stuck and there are no creases.
I usually use mat medium for this type of thing but I have the Mod Podge in my stash
 and want to use it up.

I selected Lavender, Guava, Lemon, Gold Champagne and Metallic Mint gelatos
and scribbled them randomly on top of the tissue.
I used a baby wipe to blend them.
I kept adding colour and blending until I was happy with my page.
As you can see from the colours selected I was going for a pastel background.


I used TCW stencil called Tile Texture to add some Modelling/Texture paste randomly to the page.
This dries white and gives the page a lift.


The focal points for the page are created by cutting stars from white cardstock using my 
Nellie's Multi Frame Star die and my Big Shot. I cut six in total, in an assortment of sizes.

To colour my starts I used Jane Davenport's Brights watercolour palette.
I sprayed the white cardstock stars with water and then used my 
water brush to add the purple watercolour pigment.

Once the watercolour was dry I stamped Kaszazz's Lifes Moments Background stamp,
with Versafine Onyx Black ink, to cover each star

The stars were attached to the page using Mod Podge.

I used my Stabillo All Pencil in black and my water brush to shade around each of the stars.

My quote was cut from black cardstock using Sizzix 662667 Alphabet die
 and attached to the page using Mod Podge.
I gave the quote a coat with my Wink of Stella Clear pen.

To add sparkle to the stars I brushed a coat of Nuvo Clear Drops - Morning Dew over each star.
This did not give the sparkle I was looking for so I added Spellbinders - Sparkle Dust Glitter.
As the Nuvo Drops were dry in some areas the glitter has stuck randomly
 to the stars, a look I am very happy with.

To finish my page off I added a scribbly boarder around the outside using my Fineliner bottle that holds slightly watered down black acrylic paint.

Here is my process video


As always, thank you for spending part of your day here with me today

Till next time
Stay safe
Hugs
Julie


Friday, October 15, 2021

Layout using shaker elements

Hi there

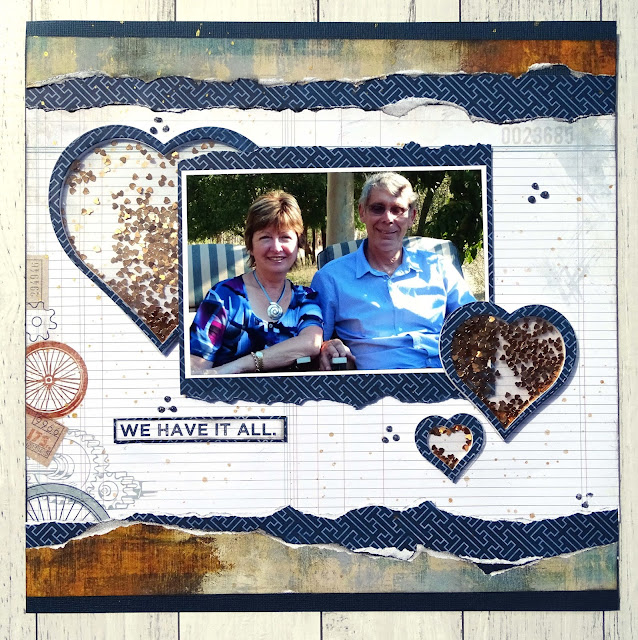
Today's layout uses three shaker elements as embellishments

I have created see through shakers so the patterned papers behind the shakers is still visible.


The patterned paper I have used on this layout is from the Kaisercraft Workshop Collection

The background is a sheet of Navy Cardstock

I have torn two strips of Courageous and two strips of 
Dashing to layer at the top and bottom of the Navy cardstock.

The centre panel is a 8 1/2" x 12" piece of Tough paper


For a little interest on the background I created some splatters using Antique Brass Glimmermist

The title is the branding strip from Courageous 
that I have matted on some of the Courageous patterned paper.

I used my stitched heart die to cut five white heart frames
 in each of the 3 sizes and one of the frames in each size from Courageous

I used Art Glitter Glue to attach the white layers on top of each other.

I cut 2 acetate hearts, of each size, using the largest die I used to cut each frame.

Once I had all of my white layers attached, I attached one of the acetate hearts and then the Courageous frame on top of that so I had my white heart frames, an acetate heart and then the blue frame.

I turned the hearts upside down so the acetate was on the bottom
 and added Bronze heart glitter to each frame. 
The remaining acetate hearts were then attached 
trapping the glitter between the two layers of acetate.

This creates a see through shaker element so the patterned papers can be seen through them.


My photo is 6" x 4" and I matted that on a piece of white cardstock that is 6 1/8" x 4 1/8"
 and then onto a piece of the Courageous patterned paper
 with torn edges at the top and bottom of the photo.

To finish my layout off I have added tiny dot of Nuvo Glitter Drops
 in Midnight Blue randomly to the background.

Here is my process video. I hope you enjoy watching it.


As always, thank you for spending part of your day here with me today
Till next time
Stay safe
Hugs
Julie