Monday, December 31, 2018

Queensland Holiday and Movie World Layouts

Good afternoon,

I have been very slack on my blog lately, what with Christmas and having visitors stay with us, I have been a bit pressed for time.

I have posted process videos for both of these layouts and I will put a link to each one under its photo.

These are two of the layouts I have done for my grand-daughters 2019 album. They are 8" x 8".

Throughout the album I have used a Kaisercraft paper pad with the "Party" paper range in it.

The cameras were created using a Kaisercraft stamp and heat embossing before fussy cutting them.

The arrows are a Kaisercraft die and the white stitched circle behind the camera and film strip at the bottom of the photo is another Kaisercraft stamp and die set item that I have heat embossed.

When I had finished the basic layout it looked a little bare so I decided to doodle around the edge of all the patterned papers and the background card stock.


You will find the video here

The paper I used for the background had banners printed on it so I decided to carry the banner theme through the whole layout. I have used an assortment of dies to cut banners from an assortment of patterned papers and positioned them across the top left corner. 

The photo has been layered on a few scraps of paper I had sitting on my desk.

The admission ticket has been used as an embellishment on the right hand side of the layout.


You will find the video here

I hope you will check out the videos and give me a thumbs up and subscribe to my channel if you haven't already.

Thanks for dropping by
Till next time
Hugs
Julie

Wednesday, December 19, 2018

Christmas Cards 2018 No 7

Good morning everyone

Today I am sharing the last of my Christmas cards for this year. I have made 35 so if you have checked out my videos for them all, thank you very much for sticking with me.

If you have a look at this video you will find links to all my other videos in the description box below it.

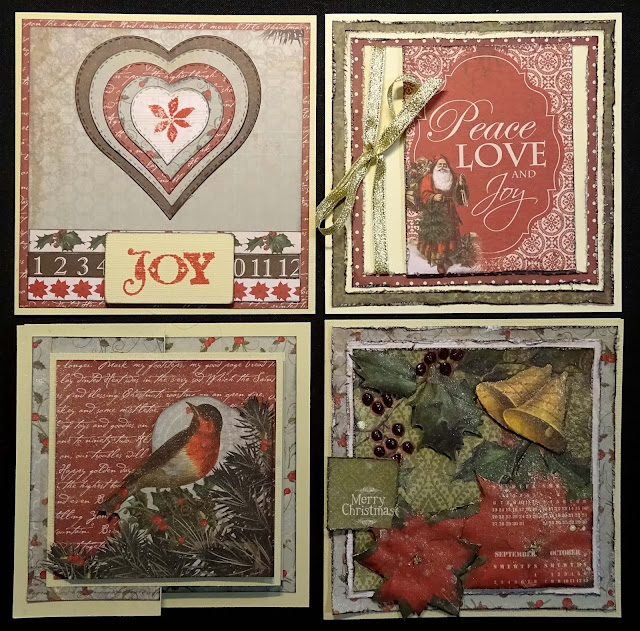
I have gone for the vintage look with these last 4 cards and I have used Kaisercraft's St Nicholas paper range from a few years ago.


This card is for my husband and that is why I have used hearts on it, not something I would normally put on a Christmas card. I have used a 5 1/4" square cream card base. I have layers 2 patterned papers on the card base making each layer a 1/4" smaller in both directions than the one below it. All of the patterned papers have been inked.
The 3 strips across the bottom of the card are branding strips from the bottom of some of the patterned papers.
The hearts were cut using decreasing sizes of a stitched heart die. I folded each heart in half and used glue to attach the hearts to each other down the middle fold only.
The flower in the middle of the hearts and the greeting were stamped using Fired Brick Distress Ink.
The greeting was stamped on the same card that the card base was made from, cut into a rectangular shape then I rounded the corners.


I have used a 5 1/4" square card base for this card too. I have also used the same card stock to mat each of the patterned papers. All of the patterned papers and cardstock have been distressed and inked. The green cardstock is 5" x 5", the cream cardstock is 4 1/2" x 4 1/2", the red cardstock is 4 1/4" x 4 1/4" and the cream cardstock that I have used for the front panel is 4" x 4". I cut a panel from the cut-apart sheet and attached that to the panel and then tied some gold ribbon around the panel before attaching it to the card using foam tape.


The cream  card base is 5 1/4" square for this card also. I have cut patterned paper 5" square, 4 1/2" square and 4 1/4" square. The edges have all been distressed and inked. I fussy cut the bells, leaves and poinsettias, shaped them with my shaping tooling a light spray of water, then attached them to the card front using foam tape. I cut the greeting from the patterned paper and distressed and inked the edges before attaching it to the card. I used my Scribbles, which is similar to Stickles, to give the berries some dimension.


This card is a Z fold card. The card base is 5" x 10" and scored at 2 1/2" and 5". The second piece of cream cardstock was cut to 9" x 4 " and scored at 4" and 6 1/2".

The green patterned paper was cut to 4 1/2" square and 2 pieces at 4 1/2" x 2 1/4".

The patterned paper has been inked and then attached to the larger piece of cardstock, The 4 1/2" piece goes on the largest panel and the others go on the front panel that has been folded out onto itself and the inside section of the folded front panel. When you attach the patterned paper to the front panel be sure to line it up with the edge of the fold and the patterned paper panel below it.

Attach the smaller panel to the card base so that the largest section (4" square) is central on the front folded section. You will only need to apply tape or glue to half of this piece. Attach tape/glue to the back of the end panel of the smaller piece of cardstock and close the card up as it will be when it is completed.

Now we can decorate this panel. I have cut some patterned paper 3 3/4" square as the base and then I fussy cut the bird from the patterned paper and used foam tape to attache it to the card.

I also stamped a Christmas greeting on the inside of the card as I have not put one on the outside.


Hope you will try these cards for yourself. I would love to see what you make if you do.

If you can not follow my directions very well because it can be a bit confusing at times, don't forget you can see the video here and that will show you how they are made with sizes and full instructions.

Thanks for dropping by
Till next time
Hugs
Julie

Sunday, December 16, 2018

Christmas Cards Number 6 2018

Good morning.

I am sharing with you 6 more Christmas cards today. I have a video for you . You can see it here.

These are the cards I have made.


This card is 5.25" x 5.25" and cut from a piece of cardstock that already had the dot embossing on it. I have used my Scan N Cut to cut the baubles using a free file I got from Alanda Crafts, last year I think. I have used a brad to attach the baubles to a piece of the card used for the card base and then layered that onto 3 other pieces of cardstock/patterned paper before attaching that to the card base with foam tape. The greeting was matted on gold paper and attached to the card using foam tape.


This Christmas tree was cut from patterned paper, on my Scan N Cut. I can not remember where this file comes from I'm afraid. The cut file was for the top layer of the tree so I added the background layer which I cut in green. The white card base is 4" x 6". Using the green cardstock I used in the previous card I created a panel that is 3" x 5.75". I wrapped some ribbon around the bottom of it, securing it with d/s tape at the back and then layered the Christmas tree on some white cardstock that I had embossed using a music embossing folder and my Big Shot and then another piece of the same patterned paper I cut the Christmas tree out of. The tree was attached to the panel using foam tape and the panel was attached to the card base using d/s tape.


This is a very simple card. I cut 2 baubles from white cardstock with my Scan N Cut and then embossed them with the Swiss dots embossing folder. I attached the little gold bits that I had cut from gold cardstock, threaded some gold ribbon through them and then attached the ribbon to the card with d/s tape. The baubles were attached with foam tape. I then added Scribbles/Stickles, in red to each of the dots. They have a lovely texture which does not show very well in this photo, but you can see it clearly in the video. The greeting was attached using d/s tape


This Christmas tree was cut using my Scan N Cut once again. The top layer has holes cut in it and I created the bottom layer and cut it from gold paper so it looked like the baubles were gold.
The green card base is 5.25" square and the blue patterned paper is 5" square.
The Christmas tree is attached with foam tape and so is the greeting.
I cut the star using Nellies Multi Frame Star die.


While I had the cut file on my Scan N Cut for the card above I changed the size of it and cut this tree from white cardstock. I have used the negative cut for this card. I cut 1/2" steps of patterned paper and layered them onto the front of a 4" x 6" white card base. I then used foam tape to mount the negative tree cut out on top of the card base. I added a star to the top of the tree and matted a computer printed greeting on some patterned papers and added that below the Christmas tree.


I have used the cut out from the card above to create this card. I have embossed this Christmas tree using a Cuttlebug embossing folder, attached some gold circles and a gold star to the tree and then attached it to the patterned paper panel which measures 3 3/4" x 5 3/4'. I have then added a ribbon with a bow to the bottom of the panel before I added it to the card base using foam tape.


That is it for these 6 cards.

I have 4 more cards to share later in the week which will complete the 35 cards I have made this year.

I hope you can find time to check out my video here

There are also links to all of the other Christmas card videos I have posted in the description of this video.

Thanks for dropping by
Till next time
Hugs
Jullie


Monday, December 10, 2018

Christmas Cards No 5 2018

Todays post is so that I can share my latest Christmas card video with you.

You can see it here

These are the cards.

I have used Kaisercraft's Sparkle range for all of the cards today. I have cut my own card bases, they are all 4" x 6". All of the papers have been inked before being used.


I started with a pink card base for this card. I used Die-Namics Mix and Match Banner die to cut 5 of the fish tail banners and the smallest die from Lifestyle Crafts Nested Lace Circles die set to cut 5 circles. I matted the banner pieces on black cardstock

The white cardstock is 5 1/2' x 3 1/2".

The banner was attached to the white panel using a sewing machine. I also stitched the patterned paper to it's mat that holds the Christmas greeting

The size of the greeting matt will depend on the size of your greeting. I have printed an assortment of greeting in different sizes and fonts and printed them out and use the one that I think best fits the space and the style of the card.

I folded the circles in half and then glued them over some twine, to form a half circle banner. This was attached to the panel using brads.

The panel was then attached to the card base using foam tape and the greeting panel was attached using foam tape too.


I cut a piece of patterned paper 5 7/8" x 3 7/8" and put it through my Big Shot with an embossing folder.

The fishtail banner is 3 1/5" long and 1 1/2" deep.

To cut the Christmas trees I cut a rectangle that was 3" x 1 1/2", found the middle point on one of the shorter edges and then using my scissors cut from the corner of the other short ent to the point I  had just marked, then repeated this for the other side. I made 3 of these and attached them to the card using double sided tape. I cut a small gold star using my Nellie's Multi Frame Star die and attached that to the top of the trees.

I then chose a greeting, matted it on some patterned paper and attached it to the card using foam tape.


Four strips of patterned paper 3/4" by 5" with a fish tail cut out of one end were embossed using a Cuttlebug Embossing folder and my Big Shot.

A piece of patterned paper,  4" x 1 1/4" was punched on each long edge and then matted on a piece of darker patterned papers with about 1/4" extended past the top and bottom of the punched piece. This was attached at about the middle of the card using foam tape.

The white cardstock was cut to 3" x 1 1/2" and embossed with the same folder as I used on the patterned paper. The Christmas tree, which was stamped using one of the stamps from Kaisercraft's Sparkle clear stamp set then heat embossed, was attached to the centre of the white cardstock then attached to the front of the card using foam tape at the top and double sided tape in the middle so it would sit level.

The greeting is a rub on from Kaisercraft.


This card uses the waste from cutting out the Christmas tree I used in the previous card.

I cut a piece of patterned paper 5 3/4" x 3 3/4" and attached that to the card base.

Next I cut 7 pieces of patterned paper 1/2" by 3 3/4" and attached them to the card front, approximately central.

I tied a piece of twine around the pink negative cut out panel and a gold star to the top of the tree and then attached that to the card using foam tape.

The matted greeting was also attached with foam tape.


The papers on this card were all distressed as well as inked. The background panel is 5 3/4" x 3 3/4".

The larger fishtail banner is 3" x 5" and the other one is 2 1/2" x 4 1/2".

The scalloped circle is the 4th in the set of Lifestyle Crafts Nested Lace Circles. (Approx 3")

The bauble embellishment is from the collectables pack that goes with this range, I have tied some twine through the loop and attached it to the scalloped circle.

The scalloped circle is attached to the card using foam tape.


Hope you have enjoyed looking at these cards.

Pop over and check out the video here and see them being made. Hope this inspires you to make some cards.

Till next time
Hugs
Julie

If Cats Had Phones Art Journal page

Good afternoon everyone.

This post is about this art journal page.


I started with a background that I created a long time ago and it was very bright, so I gave it 2 thick coats of Gesso letting it dry between coats. The colour was so strong it bled through the Gesso.
I did not add anymore colour to the background as I wanted a very light palette for the design to stand out against. 

I used Dylusions Diamonds in the Rough mini stencil and some Matisse Iridescent Medium to add some texture. 

Using Stayzon ink in black I stamped randomly using Kaszazz's Life's Little Moments stamp. 

With Watering Can (Grey) Archival ink I stamped Clearly Besotted's solid leaf stamp here and there around the edges of the page.

Next I used Jet Black Archival ink and Dylusions leaf outline stamp from the Further Around the Edge stamp pack to add more leaves to the edges of the page.

The orange flowers were stamped with a stamp I got with a magazine purchase and Tiger Lily Archival Ink.

To create the cats I used a Dylusions Puddy Cat stamp and Stayzon Ink on water colour paper. The large cat is coloured using water colour pencils and for the small cat I used Twinkling H2O's. These were then fussy cut and attached to the page using Matt Gel Medium

I have shaded around the cats using a black Faber-Castell Big Brush marker.

The leaves were also coloured using a Big Brush Marker in Leaf Green.

I have then detailed the cats and the orange flowers using an Artline 0.4 tip permanent marker

The heading was a stamp in the same stamp pack as the cats, so I stamped it on watercolour paper and attached it to the page with Matt Gel Medium before detailing around it with the same pen as I used previously.

To finish the page off I ran around the edge of the page with a gold ink pad and a black one.

Thanks for dropping by
Till next time
Hugs
Julie


Wednesday, December 5, 2018

2009 Layout


Hello,

Today I am sharing a layout I created using photos from Christmas 2009. Charli was nearly 2 at the time so it was the first year that she knew what was going on. I have a process video over on my Youtube channel so why not pop over and check it our here.

I have gone with the minimalistic look to this layout. The papers I have used are from SEI and the range is called Glitzmas. I have had this paper for some years so it is probably not available anymore.

The background has got some Modelling Paste through a Christmas Tree stencil which I have left white, so it is tone on tone but is there when you look at it in real life. A light splattering of mists in colours that coordinate with the papers finish the background off. Each of the papers and the photos are matted on white cardstock and inked.

The Baubles are cut from silver cardstock using Memory Box Snowflake Ornament die. I have used silver because there is silver in the patterned papers. Each of the baubles have been attached with a heart shaped red brad.

The photos are attached with foam tape and the patterned papers are attached using double sided tape.

I would love it if you popped over to my Youtube channel and watched my video, maybe even subscribe to my channel.

Thanks for dropping by
Till next time
Hugs
Julie