
Good morning.
I am back after two weeks in Egypt. What an experience. Loved every minute of it.
I have made two easel cards and one "M" fold Christmas card to share with you today.
You can see the video here
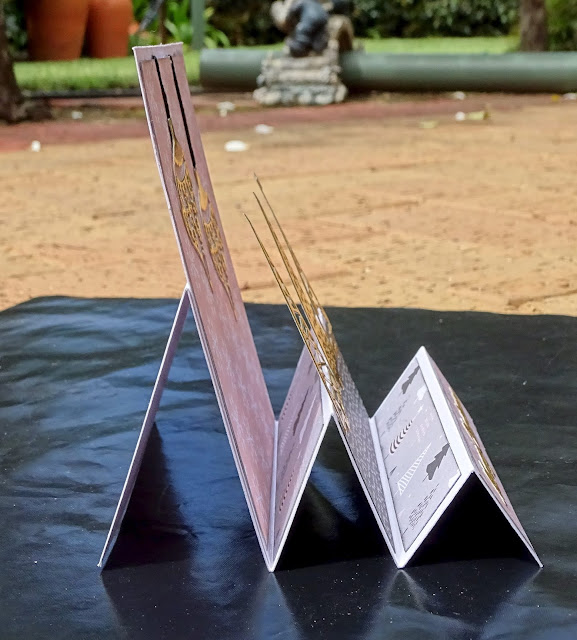
Lets start with this one
I cut 2 pieces of cardstock 5 1/4" x 10 1/2". One I scored at 2 5/8" and 5 1/4". The other one was scored at 5 1/4", 6 3/4", 8 1/4", 9 1/4" and 10 1/4".
Fold the first piece so the 2 5/8" score line creates a mountain fold and the 5 1/4" is a valley fold.
Fold the second piece so the 10 1/4" scoreline is a valley fold and then alternate mountain, valley etc until you get to the 5 1/4" scoreline which will be a valley fold.
I chose two patterned papers but you could have as many as you like.
From patterned paper no. 1 I cut 1 @ 5" x 5" and 2 @ 5" x 3/4".
From patterned paper no.2 I cut 1 @ 5" x 5",1 @ 2 1/4" x 5", 2 @1 1/4" x 5"
I then distressed and inked all of the edges of the papers.
You can see from the photos below how I have placed these papers
To make the little bar that holds the card open I cut a piece of cardstock 5 1/4" x 3/4" and a piece of patterned paper 5" x 1/2". Distressed the edges of the patterned paper and inked the edges of both pieces. I used foam tape to attach this to the card 1 1/4" from the bottom flat edge.


This card looks similar but it does not have the base running under the "steps", you can see what I mean in the side on view of the card. This card does not use as much cardstock either.
Cut one piece of cardstock 5 1/4" x 12" and one 5 1/4" square.
Score the longer piece at 1 1/4", 2 1/2", 4 1/4", 6" & 9"
Starting with the score at 9" create a mountain fold and then alternate between valley and mountain folds until you get to the 1 1/4' score which should be a mountain fold.
Attach the 5 1/4" square piece to the card base so the back of it rests between the 6" and 9" folds.
I chose three patterned papers this time. From patterned paper no. 1 I cut 1 @ 5" x 5" and 1 @ 1" x 5".
From patterned paper no. 2 I cut 1 @ 1 1/2" x 5 and from patterned paper no. 3 I cut 1 @ 1 1/2" x 5 and 1 @ 1" x 5"
I inked the edges of the papers and attached them to the cards as per the photos below.

All of the decorations on this card are die cuts cut from gold cardstock.
I have used Memory Box Snowflake Ornament, no name Christmas trees and the same greeting die as I used on the previous card.
They were all attached to the card using glue.
The final card for today is slightly different.
To make the base of this card I cut a piece of cardstock 5 1/4" x 12"
I scored it at 5 1/4", 9 1/2" and 10 3/4".
Starting with the 5 1/4" fold make a velley fold , a mountain fold and then another valley fold.
This card also has two patterned papers, from patterned paper no. 1 cut 1 @ 5" x 5" and 2 @ 4" x 5".
From patterned paper no. 2 cut 4 @ 1" x 5"
Ink all of the edges and attach the patterned papers to the card base as shown in the photos below.


Thank you for spending your time here with me today.
I hope you have enjoyed looking at my cards. If you would like more detail check our the video
Thanks for dropping by
Till next time
Hugs
Julie
I am back after two weeks in Egypt. What an experience. Loved every minute of it.
I have made two easel cards and one "M" fold Christmas card to share with you today.
You can see the video here
Lets start with this one
I cut 2 pieces of cardstock 5 1/4" x 10 1/2". One I scored at 2 5/8" and 5 1/4". The other one was scored at 5 1/4", 6 3/4", 8 1/4", 9 1/4" and 10 1/4".
Fold the first piece so the 2 5/8" score line creates a mountain fold and the 5 1/4" is a valley fold.
Fold the second piece so the 10 1/4" scoreline is a valley fold and then alternate mountain, valley etc until you get to the 5 1/4" scoreline which will be a valley fold.
I chose two patterned papers but you could have as many as you like.
From patterned paper no. 1 I cut 1 @ 5" x 5" and 2 @ 5" x 3/4".
From patterned paper no.2 I cut 1 @ 5" x 5",1 @ 2 1/4" x 5", 2 @1 1/4" x 5"
I then distressed and inked all of the edges of the papers.
You can see from the photos below how I have placed these papers
To make the little bar that holds the card open I cut a piece of cardstock 5 1/4" x 3/4" and a piece of patterned paper 5" x 1/2". Distressed the edges of the patterned paper and inked the edges of both pieces. I used foam tape to attach this to the card 1 1/4" from the bottom flat edge.

The tag decoration on the card was cut from the cut apart sheet in the paper pad and mounted on a piece of gold cardstock. I then added a gold eyelet and some black crochet cotton. I used d/sided tape to attache this to the back panel of the card.
The Santa face is a stamp that I have had for quite some time. I have stamped it with my Versamark Embossing ink and then added black embossing powder before heat setting. Watercolour pencils and a water brush were used to colour the hat pink and a gold gel pen filled in the holly leaves and berries. Once I had fussy cut the face out I attached it to the centre step of the card.
The Christmas trees on the front step of the card were stamped on white cardstock using Kaisercraft's Sparkle stamp set and Versamark ink. They were heat embossed with gold embossing powder and fussy cut.
The greeting was cut using black cardstock and Elizabeth Craft Designs 745 Merry Christmas die. This was attached to the front flat section of the card using glue.

Cut one piece of cardstock 5 1/4" x 12" and one 5 1/4" square.
Score the longer piece at 1 1/4", 2 1/2", 4 1/4", 6" & 9"
Starting with the score at 9" create a mountain fold and then alternate between valley and mountain folds until you get to the 1 1/4' score which should be a mountain fold.
Attach the 5 1/4" square piece to the card base so the back of it rests between the 6" and 9" folds.
I chose three patterned papers this time. From patterned paper no. 1 I cut 1 @ 5" x 5" and 1 @ 1" x 5".
From patterned paper no. 2 I cut 1 @ 1 1/2" x 5 and from patterned paper no. 3 I cut 1 @ 1 1/2" x 5 and 1 @ 1" x 5"
I inked the edges of the papers and attached them to the cards as per the photos below.

All of the decorations on this card are die cuts cut from gold cardstock.
I have used Memory Box Snowflake Ornament, no name Christmas trees and the same greeting die as I used on the previous card.
They were all attached to the card using glue.

The final card for today is slightly different.
To make the base of this card I cut a piece of cardstock 5 1/4" x 12"
I scored it at 5 1/4", 9 1/2" and 10 3/4".
Starting with the 5 1/4" fold make a velley fold , a mountain fold and then another valley fold.
This card also has two patterned papers, from patterned paper no. 1 cut 1 @ 5" x 5" and 2 @ 4" x 5".
From patterned paper no. 2 cut 4 @ 1" x 5"
Ink all of the edges and attach the patterned papers to the card base as shown in the photos below.

to create the panel that hold the greeting cut a piece of black cardstock to 3 1/4" x 2 1/2", a piece of patterned paper to 3 1/8" x 2 3/8" and a piece of gold cardstock to 2 1/2" x 1 3/4". Ink all of the edges and layer them on top of each other.
Attache this to the front of the card as shown in the photo.

The greeting for the inside of the card is a Kaisercraft stamp from the set called Merry Christmas stamped with Versamark ink and heat embossed with gold embossing powder.
Once I had fussy cut the image I attached it to the inside of the card using glue.
The decoration on the from of the card was die cut from black cardstock using Memory Box Snowflake Tree die and attached with glue also.

Thank you for spending your time here with me today.
I hope you have enjoyed looking at my cards. If you would like more detail check our the video
Thanks for dropping by
Till next time
Hugs
Julie
No comments:
Post a Comment
Thank you for your comment