Wednesday, November 27, 2019

Art Journal page - Unique

Good morning

Today I am sharing an Art Journal page that I created as a break in my Christmas card making.

I had been thinking of doing this technique for a while now. I have heaps of metal embellishments and am trying to use up my stash.

You can see the video here.

I added some Mont Marte Modelling paste through Kaisercraft's "Script" stencil.

I used Atelier Heavy Gell Gloss to attach the metals to the page and then set it aside to dry.

Next step was to cover the whole page with Gesso and let that dry as well.

I sorted through my mists and decided to go with pinks and purples. The colours I used were, Glimmermist - Iridescent Gold, Fully Purple, Basically Bare, Black Magic & Gold.
Dylusion Ink Spray - Bubblegum Pink and Lemon Zest and Chalkboard - Chalk.

I sprayed with these colours until I had the look I was trying for, this required many coats which were dried between each application.

The two feature pieces were given a coat of Gesso, sprayed with colour and set aside to dry before I attached them to the page using craft foam and my hot glue gun. The gems were attached with clear drying glue.


I added more detail to the background using a dotted grid clear stamp with StazOn Jet Black ink and Encore Gold ink.

I felt that the background needed more colour so I used a Kaisercraft clear stamp "Bubblewrap" and Archival Chrome Yellow to add more of the yellow to the background so the yellow of the butterfly looked like it belonged on the page.

I added a border to the page using both black and white acrylic paints in a fineliner bottle.

The title is a clear sticker from The Craft Stall

Don't forget you can see the process video here.

Thank you for spending your time here with me today

Till next time
Hugs
Julie

Wednesday, November 20, 2019

Three of my Christmas Cards for 2019

Good morning

I have been back from Egypt for one week now, sometimes it feels like I have been home for months and sometimes it feels like I only got home yesterday. Hopefully I will get back in the swing of things soon.

Today's post shares with you three Christmas cards I have made this week of the 30 I have to make for the year. These three bring my total made so far to 15.

All of the cards use papers from my DCWV Merry & Bright paper pad and some gold cardstock from my stash

I recorded the process and you can see the video here.

So let's start with this card. It is a 5 1/2" x 4 1/4" top opening card.

I chose three patterned papers. I cut one to 5 1/4" x 4", two pieces of the black paper, 1 @ 4 3/4" x 3 1/2" and one @ 1 1/2" x 5 1/4" and the third patterned paper to 2" x 5 1/4".

I used my Prima distressing tool and a black ink pad to distress all of the patterned paper edges.

I used a die to cut each bauble out 3 times from white cardstock. I then glued them on top of each other to create four nice thick baubles to embellish my card.

Double sided tape was used to attache the 1 1/2" piece of black patterned paper to the 2" piece of pink paper, then using glue I attached the baubles and the gold twine so the baubles look as though they are hanging from the twine. This panel was then attached to the larger black patterned paper that had been attached to the background piece of patterned paper.

The twine was then attached to the larger panel and wrapped around to the back of the patterned papers.

This panel was then attached to the card base using self adhesive craft foam.

To create the "Merry Christmas" greeting I used an Elizabeth Craft Designs die and some gold cardstock and attached this to the lower part of the card, using glue.


I cut the card bases for the next two cards from a sheet of white cardstock. They are 5 1/4" square.

The second card has three patterned papers also, the largest is 5" x 5" The lightest paper is 2 3/4" x 5" and the pink paper is 2" x 5".

Once again I have distressed all of the papers with my distressing tool and black ink.

I cut a piece of the gold glitter mess so it was about 5" long by it's full width (which is less than 5")

I used double sided tape to attach the largest piece of patterned paper to the card base, laid the mesh on top of that and then attached the next two layers of patterned paper using glue. The glue behind the 2 3/4" piece pf patterned paper holds the mesh in place.

The greeting was once again cut from the gold cardstock using a die I bought on the internet.


I made the baubles to embellishments the final card using two Kaisercraft stamp sets. One is from the Sparkle stamp set and two are from the Merry Christmas stamp set.

I used Versamark clear ink to stamp the images and then heat embossed them with fine gold embossing powder.

I then fussy cut each bauble and added a star shaped brad.

The black patterned paper measures 5" x 5" and the pink measures 2 1/2" x 5".

I mounted the pink patterned paper on a piece of white cardstock that measures 2 3/4" x 5" to give the patterned papers some separation.

The edges of all of the papers has been inked with a black ink pad.

The black patterned paper is attached to the card base with double sided tape and the white cardstock is attached on top of it with self adhesive craft foam for a little dimension.

Finally the pink paper is attached onto the white and then the baubles are placed on the pink paper.

I have used the "Merry Christmas" on the middle baubles as my greeting.


These three cards are very simple and easy to make so I hope you try them out. You will be amazed how different they look when you use different patterned papers.

If my description is a bit hard to follow, don't forget that you can see me make these cards on my YouTube channel here.

I hope you have enjoyed reading about my Christmas cards today

Thanks for dropping by
Till next time
Hugs
Julie

Wednesday, November 13, 2019

Easel Christmas Cards

Good morning.

I am back after two weeks in Egypt. What an experience. Loved every minute of it.

I have made two easel cards and one "M" fold Christmas card to share with you today.

You can see the video here

Lets start with this one

I cut 2 pieces of cardstock 5 1/4" x 10 1/2". One I scored at 2 5/8" and 5 1/4". The other one was scored at 5 1/4", 6 3/4", 8 1/4", 9 1/4" and 10 1/4".

Fold the first piece so the 2 5/8" score line creates a mountain fold and the 5 1/4" is a valley fold.

Fold the second piece so the 10 1/4" scoreline is a valley fold and then alternate mountain, valley etc until you get to the 5 1/4" scoreline which will be a valley fold.

I chose two patterned papers but you could have as many as you like.
From patterned paper no. 1 I cut 1 @ 5" x 5" and 2 @ 5" x 3/4".
From patterned paper no.2 I cut 1 @ 5" x 5",1 @ 2 1/4" x 5", 2 @1 1/4" x 5"
I then distressed and inked all of the edges of the papers.
You can see from the photos below how I have placed these papers

To make the little bar that holds the card open I cut a piece of cardstock 5 1/4" x 3/4" and a piece of patterned paper 5" x 1/2". Distressed the edges of the patterned paper and inked the edges of both pieces. I used foam tape to attach this to the card 1 1/4" from the bottom flat edge.


The tag decoration on the card was cut from the cut apart sheet in the paper pad and mounted on a piece of gold cardstock. I then added a gold eyelet and some black crochet cotton. I used d/sided tape to attache this to the back panel of the card.

The Santa face is a stamp that I have had for quite some time. I have stamped it with my Versamark Embossing ink and then added black embossing powder before heat setting. Watercolour pencils and a water brush were used to colour the hat pink and a gold gel pen filled in the holly leaves and berries. Once I had fussy cut the face out I attached it to the centre step of the card.

The Christmas trees on the front step of the card were stamped on white cardstock using Kaisercraft's Sparkle stamp set and Versamark ink. They were heat embossed with gold embossing powder and fussy cut.

The greeting was cut using black cardstock and Elizabeth Craft Designs 745 Merry Christmas die. This was attached to the front flat section of the card using glue.


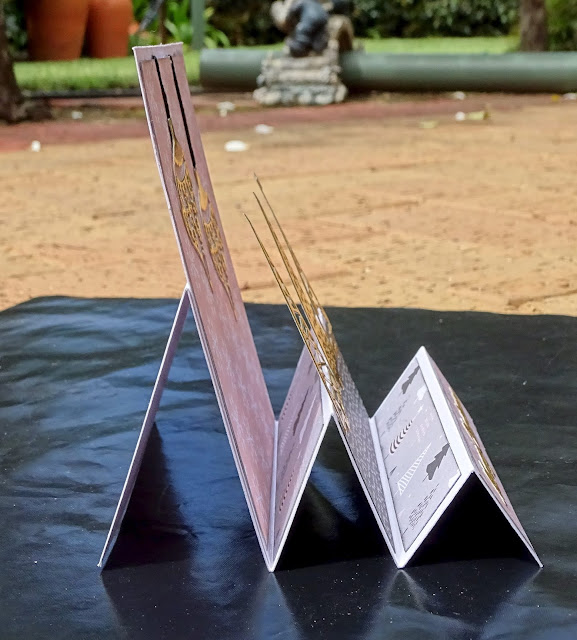
This card looks similar but it does not have the base running under the "steps", you can see what I mean in the side on view of the card. This card does not use as much cardstock either.

Cut one piece of cardstock 5 1/4" x 12" and one 5 1/4" square.
Score the longer piece at 1 1/4", 2 1/2", 4 1/4", 6" & 9"
Starting with the score at 9" create a mountain fold and then alternate between valley and mountain folds until you get to the 1 1/4' score which should be a mountain fold.

Attach the 5 1/4" square piece to the card base so the back of it rests between the 6" and 9" folds.

I chose three patterned papers this time. From patterned paper no. 1 I cut 1 @ 5" x 5" and 1 @ 1" x 5".
From patterned paper no. 2 I cut 1 @ 1 1/2" x 5 and from patterned paper no. 3 I cut 1 @ 1 1/2" x 5 and 1 @ 1" x 5"

I inked the edges of the papers and attached them to the cards as per the photos below.


All of the decorations on this card are die cuts cut from gold cardstock.

I have used Memory Box Snowflake Ornament, no name Christmas trees and the same greeting die as I used on the previous card.

They were all attached to the card using glue.


The final card for today is slightly different.

To make the base of this card I cut a piece of cardstock 5 1/4" x 12"

I scored it at 5 1/4", 9 1/2" and 10 3/4".

Starting with the 5 1/4" fold make a velley fold , a mountain fold and then another valley fold.

This card also has two patterned papers, from patterned paper no. 1 cut 1 @ 5" x 5" and 2 @ 4" x 5".
From patterned paper no. 2 cut 4 @ 1" x 5"

Ink all of the edges and attach the patterned papers to the card base as shown in the photos below.


to create the panel that hold the greeting cut a piece of black cardstock to 3 1/4" x 2 1/2", a piece of patterned paper to 3 1/8" x 2 3/8" and a piece of gold cardstock to 2 1/2" x 1 3/4". Ink all of the edges and layer them on top of each other.

Attache this to the front of the card as shown in the photo.


The greeting for the inside of the card is a Kaisercraft stamp from the set called Merry Christmas stamped with Versamark ink and heat embossed with gold embossing powder.

Once I had fussy cut the image I attached it to the inside of the card using glue.

The decoration on the from of the card was die cut from black cardstock using Memory Box Snowflake Tree die and attached with glue also.


Thank you for spending your time here with me today.

I hope you have enjoyed looking at my cards. If you would like more detail check our the video

Thanks for dropping by
Till next time
Hugs
Julie