Showing posts with label Die cut. Show all posts

Wednesday, July 13, 2022

Make the Card Challenge #59

Hi there

This is my first project as part of the Design Team at Make The Card Challenge (MTCC)

You will find the challenge here.

This weeks challenge is to use this sketch to create your card.


and this is the card I created


You can see I have changed the shape of the card from rectangular to square
as I prefer making square cards and I have given it a shabby chic feel.

My 5 1/4" card is cut from some pale blue/grey cardstock with a light fleck in it.

I have used Denise Boddey Designs - Le Jardin Romantique patterned papers for this card

I cut a piece of Garden Letters to 5" square
and a piece of Song Blossom to 4 3/4" square.
I also cut 3 x 3/8" strips of Natures Romance.

I used my Tim Holtz Distressing Tool to distress all of the edges 
before inking with Vintage Photo Distress Ink.

The two squares of patterned paper were attached to the front of the card
then a layer of fine glimmer mesh was laid on top of them.

The diagonal strips were attached using liquid glue which also holds the mesh in place.

I stamped and heat embossed the largest flower from 
Craft Barn's Primrose stamp and die set onto  Enchanted Florals paper.
This flower was cut in half before I added it to my fussy cut cluster.

The sentiment was cut from Gold Pearlised cardstock using 
Uniquely Creatives Brush Script Sentiments Die

Below is the process video for this card
I hope you enjoy watching it.


Why not pop over to MTCC and check out the cards made by the other DT members?

You will find the challenge here.

Till next time
Stay safe
Hugs
Julie

Friday, June 10, 2022

Mystical Scrapbooks June Cyber Crop.

Good morning

Today I am sharing the layout I created for the June Cyber Crop at Mystical Scrapbooks.

The theme for this month is sketches and my layout uses this sketch


This is a nice clean open layout and here is my take on it


I added foil to the background by putting Deco Foil Transfer Gel through Dusty Attic's Criss Cross stencil.
Once that was dry I rubbed gold Fab Foil over the top of the Gel.

I used Cocoa Vanilla Daydream papers for this layout.

The yellow/orange paper is Daydream - Sun Shower
I cut it to 5" x 12"

The grey spot is Daydream - Garden Variety
I cut it to 7 1/2" x 6 1/2"

The rainbow paper is Sunkissed - Summer Lights
I cut it to 2 1/2" x 8 1/2". I cut a fishtail into one of the narrow ends.

The tag was cut from Daydream - Stepping Stones.
I cut the tag using Uniquely Creative Tags, Tops & Tails die.

The title was cut from black cardstock using Sizes 662667 Alphabet die.
I attached the title with glue and coated it with Glossy Accents.

The photos were matted onto black cardstock.
Cardboard was attached to the back of the photo matt before it was attached to the page.

Final touch was to add a scribbly border to the page and the patterned papers.


Here is my video.
I hope you enjoy watching it.


Thank you for spending part of your day here with me today

Till next time
Stay safe
Hugs
Julie


Sunday, June 5, 2022

One Page Wonder for Denise Boddey Designs

Good morning

Today I want to share a great little one sheet wonder using 


Cut your sheet into 2 pieces 6" x 12"

Score each piece at 5" and 10"
Use a corner rounder on the two corners of the 2" section

Use double side tape or glue to attach one of the 2" sections 
to the outside front of the second piece applying tape/glue to two sides and the bottom.
It is easy to see this process in the video which is below

I used my Crop-O-Dial to add an eyelet to the 2" section on the right hand end of the folder.

I threaded ribbon through the eyelet and wrapped it around the album
 a couple of times and tied a bow.


I made an assortment of embellishments for this album

I used 
Craft Barn Primrose Die
We R Memory Keepers Envelope Punch Board
Martha Stewart Score Board
Die-namics Just the Ticket die
Finniss Dies - Invitation 1 die
Denise Boddey Chipboard Arch

You can see how I used all of these things to decorate my album in my video


This is a fun, easy project and I hope you will try it out.

Thank you for spending part of your day here with me today
Until next time
Stay safe
Hugs
Julie


Sunday, March 20, 2022

DT projects for Denise Boddey Designs

Good morning

Today I am sharing three cards I made with the beautiful 


The first card is a Z fold card


I create all of my own card bases using 300gsm smooth white cardstock.

For the first card I cut a piece of cardstock 10 1/2" x 5 1/4"
I scored it at 2 5/8" and 5 1/4"
The card is folded in half on the 5 1/4" score and the fold at the 2 5/8" score is a valley fold.

All of the patterned paper on this card have had the edges distressed 
with my distressing tool and inked with a black Versacolor Ink cube.

I cut three pieces of Song Blossom
 1 @ 5" square
2 @ 2 3/8" x 5"

These were attached to the three sections you can see when your card is open.

I used my Spellbinders Decorative Labels 8 and Enchanted Florals to cut a panel.
I ran this panel through my Big Shot with Couture Creations 
Flamingos & Hedgehogs embossing folder.

I swiped my black ink cube over the front of this panel to help the design stand out a little more.

 The panel was then attached to the front for the card so it over hangs the 2 5/8" folded line.

I trimmed a piece of scalloped lace and attached that overlapping the left edge of the rectangular panel.

I have painted a piece of chipboard white and added that on top of the lace.
A layer of clear Wink of Stella added a little sparkle to my chipboard.
I am not sure of the name of this chipboard, it looks like a sea grass. I have cut it in half to use.

I have fussy cut images from Natures Romance and Song Blossom
to embellish further. These were added on top of the chipboard.

The sentiment is computer generated, it is matted it onto a piece of Enchanted Florals 
and attached it to the card front with a piece of cardboard behind it.


The second card is an easel card


The card base is the same size as the previous card and scored at the same measurements.

I have also cut a 5 1/4" square piece of the same cardstock.

Fold your card in half at the 5 1/4" score and a mountain fold at the 2 5/8" score line.

Flatten the front of the card base, and with your card sitting right was up,
apply glue to the right hand half of the the front section.

Lay the 5 1/4" square of cardstock directly on top of the cardbase, 
being sure to line up all of the edges.

Now we have our cardbase ready to decorate.

All of the edges of the patterned papers on this card have been distressed
in the same way as the first card.

I cut two 5" squares from Garden Letters and two pieces 2 3/8" x 5" from Natures Romance

One of the 5" squares was attached to the front of the card 
and the other was attached to the inside back panel.

The two smaller pieces were attached to the inside folded section of the card.

I also cut another piece of the Garden letters 4 3/4" square.
I used the reverse side of the paper and attached it to the front of the card

I used a Martha Stewart punch to punch along 
one of the longer sides of a 3 1/2" x 4 3/4" piece of Enchanted Florals 

I cut a piece of the Natures Romance 3" x 4 3/4" 
and punched along one of the longer edges with the same punch.

 I layered these on top of each other lining the left hand edges up with each other 
with the punched edge on the right.

These were then attached to the front of the card.

I used the Couture Creation's Flamingos & Hedgehogs embossing folder 
to emboss a 2 1/4" x 4 3/4" piece of velum and attached that on top of the previous layers,
once again lining up the left hand edges.

A piece of blue and gold braid was attached on top of the panel so it curled around the panel randomly

My main embellishment was fussy cut from Song Blossom and attached to the front of the card with cardboard behind it

I added a light coat of Glossy Accents to he flowers in the image to give it a little shine.


The sentiment is from Uniquely Creative and is matted on a piece of the Enchanted Florals paper.

This was attached to the inside back of the card with a piece of cardboard behind it, this is what holds the card open for display

I added a few drops of Nuvo Drops - Morning Dew 
randomly on the fussy cut image to finish this card off.

Card 3

This is a 5 1/4" square card


I cut my cardbase 10 1/2" x 5 1/4", scored and folded at 5 1/4" on the long side.

The patterned papers on this card have the edges inked with a black Versa Color ink cube.

The base layer for this card is a 5" piece of Enchanted Florals.

The next layer is a 4 3/4" piece of Natures Romance

I have cut a piece of tulle that has gold particles in it to 5" square and attached that next.

Lifestyles Nesting Doily Circles die and pearlised gold cardstock 
were used to create a doily for my next layer.

I have painted some chipboard leaves from Botanicals and Delicate Branch
with pearlescent water colours.

Before assembling them I used my flower shaping tools to give them some dimension.

I have fussy cut a section from Song Blossom to be the foundation for my embellishment cluster.

The flowers and leaves were added next.
The flowers are mounted on cardboard.

The heat embossed sentiment was added next.

Finally I added Nuvo Glitter Drops - Midnight Sky
to the centre of each of the flowers.

Here is my process video. I hope you enjoy watching it


Thank you for spending part of your day here with me today
Till next time
Stay safe
Hugs
Julie


Friday, February 25, 2022

Art Journal page using Alcohol Inks

Good morning

Today's post shares an Art Journal page that I created using Alcohol Inks for my background

I don't use alcohol inks very often and am by no means an expert with them 
but I am very happy with the way my page turned out.


I have used Office One A4 180gsm Gloss Photo Paper for my base.
This paper came from my Mum and is not as glossy as some of the other gloss photo papers I have.
I wasn't sure if it was going to work but figured I would give it a try, nothing to loose right...

I sprinkled blending solution onto half of the A4 sheet. 
I decided to work on half the sheet at a time because the alcohol inks 
dry quite quickly and I did not want them to dry before 
I had the opportunity to move them around and get the look I was going for.

Next I added the alcohol inks.
I am using Paper Mill Shimmer alcohol inks for this page.
The colour I used are Lime Green, Grass, Ocean Blue and Sea Breeze
I also added a few drops of Slate, this is not a shimmer.

I used my Couture Creations "puffer" tool to move the ink around, adding more blending solution and ink 
as needed to get a nice all over cover

I then added several drops of Ranger Fixative in Gold. 
I did not move this around because I wanted it to look like gold splatter.

I set this aside to dry. You can dry it with your heat gun 
but I find that moves the colour around a bit more 
and I prefer to let it dry naturally.

To add more interest to my beautiful shimmery background 
I splattered some slightly watered down acrylic paints using my fan brush.

The paints I used were 
Black Gloss, Golden Turquoise, Sparkling Sapphire Pearl and White Frost Pearl.


The focal point for my page was created by using my Big Shot to die cut white cardstock 
using a Hexagon die I purchased from Downunder Scrapbooking. It is GD2056.
I cut it from both white and pearl gold cardstock to see which one I preferred.
I chose the white because it stood out from the background better.


I used Art Glitter glue to attach the hexagons to the page.

To help my hexagons look like they are part of the page 
and to help them stand out a little more I used my Stabile All pencil in black
 and a water brush to shade around each hexagon.

I used a black fine point Sharpie to draw a double lined border 
around the page and then coloured black squares between those two lines.

A Copper 250 Opaque Texta marker was used to fill in the blank squares in the border. 
This colour is very close to the colour of the gold splatters in the background.

A fine white scribbly border, made with my fineliner bottle and watered down acrylic paint, 
was added to the inside of the border to finish it off.

I like to mix fonts for my quotes so I have used 
Kaisercraft's DD735 Uppercase Alpha die and black cardstock
 to cut "OPEN" and then printed "your mind" onto copier paper
to complet the quote.

I used Art Glitter glue to attach the title to the page.

A 0.7mm white Posca pen was used to highlight the black letters.


I have to say I really enjoyed making this page.

I love the look you get with alcohol inks and plan on using them more frequently in the future.

I have a process video
I hope you enjoy watching it.


Thank you for spending part of your day here with me today

Till next time
Stay safe
Hugs
Julie


Sunday, February 20, 2022

Making flowers using dies

Good morning

Today I am sharing a video showing how I create five flowers using an assortment of dies.

The shaping techniques I use on these flowers can be used on any fussy or die cut flowers.

You will find links to most of the products I use to make these flowers in the video description box.

These are my flowers


Hope you enjoy watching my video.


Thank you for sharing part of your day here with me today

Till next time
Stay safe
Hugs
Julie


Sunday, February 6, 2022

Denise Boddey DT album flip through

 Good morning

Today I want to share a mini album I created using Denise Boddey Designs Elegance patterned papers.

The album started life as an accordion album.
I altered the album by adding a spine and assorted flaps, pockets and a hand made envelope.

You can see that video here

All of the papers have had the edges distressed using my distressing tool 
and then inked with a VersaColor black ink cube.

Each page has a top opening pocket with a photo mat.

I have also used some velum, made some flowers using Craft Barn Stamp/Die set 
and created the tags for the album using Uniquely Creatives Tags Tops & Tails.

Lace from my stash helps to decorate the front of the album.

Here are some photos

Album Closed

Album Open


Closeup of Front Cover


Front Cover


Page 1


Page 2


Page 3


Page 4


Page 5


Page 6


Page 7


Page 8


Back Cover


The papers I have used are:-

Grace


Style


Chic


After the Rain


Refined


and the chipboard is


Delicate Branch


Here is my process video. I hope you enjoy it.


Thank you for spending part of your day here with me today


Till next time

Stay Safe

Hugs

Julie


Saturday, January 29, 2022

Live your best Life Art Journal page

Hello, hello

Welcome to my blog today where I want to show you an art journal page I have just completed.


I used Gelatos to colour the background. The colours I used are
Lemon, Red Cherry, Tangerine, Gold Champagne and Butter Cream

Once the colours were dry I gave my page a coat of Boyle Matt Spray
to seal it so the colours would not move when I added any other mediums.

I cut the circles from both white and black cardstock using Kaisercraft DD942 Stitched Circle Die.

I used pearl acrylic paints to colour the circles.
I gave each circle a couple of coats of a light colour 
then shaded around the edges with a darker tone of the same colour.

The colours I used are Duncan brand pearl acrylics
Lemon Drop, Powder Blue, Sparkling Sapphire, Bright Turquoise, Golden Aqua, Golden Lime, Golden Turquoise, and Green
I also used Folk Art Metallic Pure Gold


I stencilled onto the background using a 13@rts broken circles stencil.

Firstly I used Duncan Natural Texture (gritty paste) in Pumpkin
then Duncan Pearl White acrylic paint.

The stamping on the background is done with Archival Jet Black Ink 
and an assortment of circle stamps.
One of the stamps is Kaisercraft's Stains stamp set 
and the other two are unknown brands.


I used my black Stabilo All pencil and a wet brush to shade around each of the circles 
before giving them a scribbly border using slightly watered down
 black acrylic paint in a Fineliner bottle.

The same bottle of paint was used to draw a scribbly border around the page.

I gave each of the circles a highlight using a flat brush and some watered down white acrylic paint.

The same watered down paint was used with my fan brush to add a good amount of splatters to my page.


The quote has been stamped using Tim Holtz Cling foam stamps from the block lower alphas set.

The centre part of the quote was printed using my Brother PTouch label maker.

There is a lot of texture and shine on this page.

Here is my process video for you to check out


As always, thanks for spending part of your day here with me today

Till next time
Stay safe,
Hugs
Julie


Friday, January 7, 2022

Cards using Prima's Nature Garden 6" paper pad

Good morning

Today I am sharing a couple of cards I made using Prima's Nature Garden paper collection.
This is a very old collection and I don't think it is still available.

My aim with these cards is to use items from my stash

Both of the cards are 4" x 5 7/8" and cut from 240 gsm smooth white cardstock


Let's start with the first card


I have used two sheets of the same patterned paper for this card.
I have cut a piece 3 7/8" x 5 3/4" for the background,
a piece 2" x 4" and a piece 1" x 3" to make the fishtail pennants.

I also cut white cardstock to mat the pennants.
These measure 2 1/8" x 4 1/8" and 1 1/8" x 3 1/8"

I have inked around the edges of all of the patterned paper and cardstock 
with a Versa Color Cocoa ink cube.

The background patterned paper is attached to the card-base using double sided tape.
A layer of craft foam was attached to the back of the pennants 
before they were attached to the card front. The thinner pennant overlaps the wider one.

A strip of white lace was attached under the thinner pennant at the same time 
it was attached to the card front. I used Art Glitter glue to do this.

I used my Tim Holtz Tattered Florals die to create the flower on this card.
Here is the showing how I created this flower.


A piece of cheese cloth and a black & white Baker's Twine bow 
were added under the flower. It was attached using hot glue.

The sentiment is chipboard that has had a coat of white gesso.
I then coloured it with the Cocoa ink, this did not stand out enough 
so after I had attached it to the card I swiped over it with my black ink cube.


For the inside I cut a piece of the same patterned paper 3 7/8" x 5 3/4", inked the edges with Cocoa ink and used double sided tape to attach it to the inside right panel of the card.

I stamped happy birthday using Scrapbook.com's Happy birthday to You stamp
with Versafine's Onyx Black Ink onto white cardstock. 
I then used my heat tool and Clear Embossing powder to heat emboss the sentiment

I trimmed the cardstock down, inked the edges and attached it in the centre of the patterned paper.

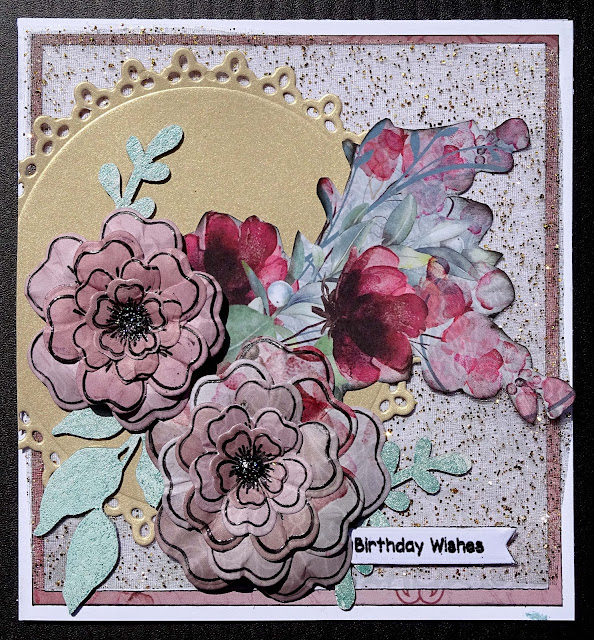
I had a flower that was left over from a previous project, it was cut using Cheery Lin's Chrysanthemum Strip die and white cardstock. I attached the flower
 and added a little Nuvo Vintage Drops in Peachy Keen to the centre just to finish it off

The second card


All of the papers and cardstock on this card have had their edges inked with a black Versa Color ink cube.

I chose two patterned papers from the pad for this card.
I cut one 3 3/4" x 5 5/8" and the other 2" x 5 5/8"

A piece of white cardstock was cut to 2 1/4" x 5 5/8" to mat the smaller piece of patterned paper.

I added some scrap chipboard to the back of this panel.

After I had attached the large piece of patterned paper to the front of the card base I used some Art Glitter glue to attach half a paper doily so the edge of it lined up with the right hand edge of the card front.

The patterned paper panel was then attached so that it slightly overlapped the edge of the paper doily

A strip of lace was attached to the centre of the panel using double sided tape.

To embellish the front of the card I stamped all of the flowers and leaves in 
Heartfelt Creations - Botanical Rose stamp set onto smooth white cardstock

To colour the flowers I used Distress Inks in Victorian Velvet and Bundled Sage and 
Distress Oxide inks in Speckled Egg and Tattered Rose

I smudged my inks onto an acrylic block and then used my water brush to 
add the colour to the stamped images.

I then fussy cut them using my spring assisted scissors

I added Nuvo Jewel Drops in Sea Breeze to the centre of each flower

I had an oval chipboard frame from Imaginarium Chipboard.
I gave it a coat of gesso and them coloured it with the 

These were all attached to the card front using hot glue

The sentiment is from Uniquely Creative's Ocean Breeze Mini Cut a Part sheet.


For the inside I cut two strips of the same patterned paper I used
 as the background panel on the card front to 1" x 5 5/8", 
I attache one strip to each side of the back inside panel.

You will find my process video below


Thank you for spending part of your day here with me today

Till next time
Stay safe
Hugs
Julie