Thursday, October 28, 2021

All that Sparkles Art Journal page

Good morning, good morning

In today's post I would like to show you a very simple art journal page I created.

I haven't used my Gelatos for ages and wanted to get them out.
I love how creamy they are and how easy they are to apply.


I used an 8 3/4" x 8 1/4" sheet of 216gsm watercolour paper. 
I punch four holes down one of the 8 1/4" edges 
and hold my pages together using jump rings.

I only use one side of the paper and on the back I write the products I have used on the page.

I have covered the whole page with Tim Holtz Tissue Wrap - Melange, 
which I have attached using Satin Mod Podge
I ran my Brayer over the tissue to ensure it is well stuck and there are no creases.
I usually use mat medium for this type of thing but I have the Mod Podge in my stash
 and want to use it up.

I selected Lavender, Guava, Lemon, Gold Champagne and Metallic Mint gelatos
and scribbled them randomly on top of the tissue.
I used a baby wipe to blend them.
I kept adding colour and blending until I was happy with my page.
As you can see from the colours selected I was going for a pastel background.


I used TCW stencil called Tile Texture to add some Modelling/Texture paste randomly to the page.
This dries white and gives the page a lift.


The focal points for the page are created by cutting stars from white cardstock using my 
Nellie's Multi Frame Star die and my Big Shot. I cut six in total, in an assortment of sizes.

To colour my starts I used Jane Davenport's Brights watercolour palette.
I sprayed the white cardstock stars with water and then used my 
water brush to add the purple watercolour pigment.

Once the watercolour was dry I stamped Kaszazz's Lifes Moments Background stamp,
with Versafine Onyx Black ink, to cover each star

The stars were attached to the page using Mod Podge.

I used my Stabillo All Pencil in black and my water brush to shade around each of the stars.

My quote was cut from black cardstock using Sizzix 662667 Alphabet die
 and attached to the page using Mod Podge.
I gave the quote a coat with my Wink of Stella Clear pen.

To add sparkle to the stars I brushed a coat of Nuvo Clear Drops - Morning Dew over each star.
This did not give the sparkle I was looking for so I added Spellbinders - Sparkle Dust Glitter.
As the Nuvo Drops were dry in some areas the glitter has stuck randomly
 to the stars, a look I am very happy with.

To finish my page off I added a scribbly boarder around the outside using my Fineliner bottle that holds slightly watered down black acrylic paint.

Here is my process video


As always, thank you for spending part of your day here with me today

Till next time
Stay safe
Hugs
Julie


Wednesday, October 20, 2021

Three Christmas Cards with Christmas trees

Good morning

I have three cards to show you today and they all have Christmas trees as their focal point


All of my card bases are made using 240gsm white cardstock and are 5 1/4" square.

All of the patterned papers are from BoBunny's Father Christmas paper range.

Card No. 1


I have used Kaisercraft's Merry Christmas stamp set to stamp and heat emboss 
baubles onto deep red cardstock using my embossing buddy, 
Versamark ink and Fine Gold Embossing powder.
 
I trimmed the cardstock to 5" square, 
I will use this as the background layer of my card.

A four layer tree die was used to cut this tree from the patterned paper.
The tree was assembled on the red panel using Art Glitter glue

I used gold mirror card to die cut the base of the Christmas tree
 and a 3/8" star punch to create the star for the top of the tree.

The greeting is from Uniquely Creative and is matted on the 
same mirror card as I used for the star and base. 
It is attached to the card front with a scrap piece of chipboard behind it.

I added dots of Pops of Colour - Glittering Champagne, 
randomly on the tree to look like Christmas baubles

I had a piece of the red heat embossed cardstock left over so I trimmed it
 to 1" x 5 1/4" and attached it to the inside left of the card

Card No. 2


A white and gold card this time. This colour combination always looks elegant I think.

I have cut a piece of the gold mirror card 4 3/4" square
A piece of white cardstock measuring 4 1/4" has been embossed using 
Sizzix 3D Texture Impressions - Mosaic Gems  embossing folder.
I had originally wanted this layer to be larger but this is the maximum size 
that this embossing folder can emboss as a square.

I cut a piece of white cardstock 4 3/4" x 2 1/2" and wrapped some gold ribbon around it 
securing it in place with double sided tape and a knot.
Scrap chipboard was added to the back of this panel before it was added to the card front.

I die cut two Christmas trees from white cardstock, backed them with gold mirror card
 and attached them to the ribbon panel

The sentiment is once again from Uniquely Creative.
It has been matted on the gold mirror card and attached to the card front using foam tape.

Card No. 3


I have used my Tim Holtz Distressing tool and a black ink cube to distress all of the edges of all of the papers used on this card.

I have cut patterned papers to 5 1/4" square, 4 3/4" square and 1 3/4" x 4 3/4"
I also cut some gold mirror card to 5" square and 2" x 5"

The square patterned paper and gold cardstock were layered onto the front of the card base.

I had the white frame sitting on my dest for some time so decided to use it on this card.

I traced around the inside and outside of the frame onto a piece of white cardstock.
Using strips of patterned paper I created the Christmas tree, 
ensuring the tree fitted inside the frame tracing.

The frame was attached to the white cardstock that had my paper pieced tree on it,
 this was then attached to the card front

I used my Semco Pearlised Watercolour palette to colour the background around the tree.

The frame was given a good coat of Wink of Stella White.

The sentiment was cut from gold mirror card using 
Elizabeth Craft Designs 745 Merry Christmas die 
and attached to the Christmas tree.

The rectangular patterned paper and mirror card were
 layered onto each other and attached to the inside right of the card.

You can watch my process video below.


Thank you for spending part of your day here with me today

Till next time
Stay safe
Hugs
Julie


Friday, October 15, 2021

Layout using shaker elements

Hi there

Today's layout uses three shaker elements as embellishments

I have created see through shakers so the patterned papers behind the shakers is still visible.


The patterned paper I have used on this layout is from the Kaisercraft Workshop Collection

The background is a sheet of Navy Cardstock

I have torn two strips of Courageous and two strips of 
Dashing to layer at the top and bottom of the Navy cardstock.

The centre panel is a 8 1/2" x 12" piece of Tough paper


For a little interest on the background I created some splatters using Antique Brass Glimmermist

The title is the branding strip from Courageous 
that I have matted on some of the Courageous patterned paper.

I used my stitched heart die to cut five white heart frames
 in each of the 3 sizes and one of the frames in each size from Courageous

I used Art Glitter Glue to attach the white layers on top of each other.

I cut 2 acetate hearts, of each size, using the largest die I used to cut each frame.

Once I had all of my white layers attached, I attached one of the acetate hearts and then the Courageous frame on top of that so I had my white heart frames, an acetate heart and then the blue frame.

I turned the hearts upside down so the acetate was on the bottom
 and added Bronze heart glitter to each frame. 
The remaining acetate hearts were then attached 
trapping the glitter between the two layers of acetate.

This creates a see through shaker element so the patterned papers can be seen through them.


My photo is 6" x 4" and I matted that on a piece of white cardstock that is 6 1/8" x 4 1/8"
 and then onto a piece of the Courageous patterned paper
 with torn edges at the top and bottom of the photo.

To finish my layout off I have added tiny dot of Nuvo Glitter Drops
 in Midnight Blue randomly to the background.

Here is my process video. I hope you enjoy watching it.


As always, thank you for spending part of your day here with me today
Till next time
Stay safe
Hugs
Julie


Wednesday, October 13, 2021

Layout for Off the Rails Scrapbooking's September challenger

Good morning

Today I am sharing a very quick layout using the Mood-board 
over at Off the Rails Scrapbooking.
The mood-board is full of bright fluro colours


The bright colours for this layout are supplied by swiping 
Colour Blast - Colour Paste across my white cardstock
using my palette knife.
The colours I used are Sunshine and Sienna.

I also used pink fluro cardstock. I cut five pieces 3/4" and one piece 1 1/2".

I used my Versafine Onyx Black ink and an assortment of star stamps from my stash
to stamp randomly over the background.

The 6" square photo, which I sanded around the edge of, is matted on black cardstock.
This is then attached to a piece of chipboard before being added to the layout.


For the title I used American Crafts - Remarks - Highline Alpha stickers.
I positioned the letters on my clear ruler so I could get it nice and straight.

A sharpie fine line texta was used to draw a scribbly border around the page.

I also underlined my title.

Here is my process video


I hope you enjoy my video, it is a quick one.

Thank you for being here with me today.
Until next time
Stay safe
Hugs
Julie


Wednesday, October 6, 2021

Curtain Lace cards

Good morning

Today I want to show you what I made with the curtain lace I coloured in this video

All of these cards use a purchased pale pink satin card base that measure 5 7/8" square

Each of these cards use Kaisercraft's Secret Garden patterned papers.


Card No. 1


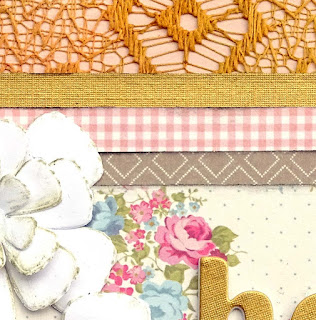
I have covered the front of the whole card base with the curtain lace.
To do this I used Satin Mod Podge

I cut a piece of gold cardstock 4" x 5 7/8"
Pink checked paper 2 @ 1" x 5 7/8"
Grey patterned paper 2 @ 1" x 5 7/8"
Floral patterned paper 2 1/4" x 5 7/8"

I attached the patterned papers to the gold cardstock to create a panel for the front of the card.


I created two flowers using pale pink velum and my Couture Creations CO724161 flower die.
When I placed them on the front of the card they faded into the background.
I used the same die and white cardstock, to create two flowers. 
I inked the edges of the cardstock with a gold ink cube to help the flowers stand out
and tie them to the gold already on the card.
A little Nuvo Glitter Drops in White Blizzard added to the centre of each flower
finished the flowers off and added a little sparkle to the card.

I die cut the sentiment four times from white cardstock and once from gold cardstock
These were attached to each other with the gold layer on top.
The sentiment was then added to the centre right of the card.

Card No. 2


I chose three papers from the pad and trimmed them to 
5 1/2" square, 5 1/4" square and 5" square.

The edges of each piece was inked with a black ink cube and attached to the card base, 
largest layer on the bottom working up to the smallest layer.

I cut a piece of white cardstock 5 1/2" x 3" and attached some of the 
white (uncoloured) curtain lace to it using Mod Podge once again.

A strip of burgundy patterned paper was cut 1" by 5 1/2" and a 
strip of gold cardstock was added to the 
top and bottom of this strip, with approximately 1/4" showing. 
This was added to the card front with a layer of chipboard behind it.

I created another of the pink velum flowers so I had three to place across the centre of the card.

The centre of the flowers is a little squirt of Pops of Colour - Glitter - Champagne


To create the sentiment I stamped "It's Your Day" from the 

I trimmed the sentiment and matted it onto some of the 
same gold cardstock that I have used on the card already.
This was attached to the card with a strip of chipboard behind it
so it sits flat against the lace layer.

Card No. 3


This is perhaps the simplest of the three cards.

I cut a piece of patterned gold cardstock to 5 5/8" square
and a piece of white cardstock 5 3/8" square.

I ran the white cardstock through my Big Shot
 with a rose patterned embossing folder
I think it is a Kaisercraft folder but not sure.

As the embossing folder was not big enough to cover the 
whole piece of cardstock I trimmed it down to 4 7/8" square.

I must put some square embossing folders on my shopping list.

I cut 4 circles from the coloured curtain lace, in decreasing sizes.
When I layered them on top of each other I lost the definition of each circle
so I cut circles from the pale pink velum to match the size of the lace circles, 
inked the edges of the velum with a black ink cube and 
attached the lace to the velum using Art Glitter glue.
Next I attached the four circles on top of each other to create my flower. 
Three black crystals added to the centre of the flower 
bring in a black element to go with the sentiment.
The finished flower is approximately 3 1/4" in diameter.

The flower is attached to the bottom left of the card front.


The sentiment for this card was cut using 
Uniquely Creative's Brush Scrip Sentiments die

Here is my process video

I hope you enjoy watching both my videos and try this technique for yourself.
It is very easy and lots of fun and I still have the cardstock I created to use on another project..

Thank you for spending part of your day here with me today

Till next time
Stay safe
Hugs
Julie 

Mod Podge Matte

https://shrsl.com/36tip

Gems Range

https://shrsl.com/36tiw

Nuvo Drops Range

https://shrsl.com/36tiu

Neenah Solar White A4 25 Pack

https://shrsl.com/36tit

Bazzil 12 x 12 Black Cardstock

https://shrsl.com/36tiz

Friday, October 1, 2021

Mystical Scrapbooking's September Challenge

Good morning folks

Today's layout is for the September challenge at Mystical Scrapbooks.
You will find the challenge here.

The theme for the month is "Challenge Yourself" 
and the challenge I have set is to use the Gladwrap (plastic wrap) technique.
If you do not know of this technique I show you how it is done 
at the beginning of the video below.
I have used this technique to create the background for my layout.

The featured product for the month is patterned paper and I am using 


The sprays I used for my background are:-

Glimmermist - Pumpkin Spice, Sandy Beach and Iridescent Gold
Dylusions Ink Spray - Lemon Zest
Chalkboard Spray - Firefly
Perfect Pearls Mist - Mandarin

All of the patterned papers have had the edges inked using a black ink cube.

The grid papers are cut 3 1/2" x 4". 
I cut 2 each from - Home Grown, Take Flight and Family Ties

Each of these 6 rectangles were then matted onto 
black cardstock so I had a 1/16" border on all sides.

I used a die to cut my pennants, but you could just cut small triangles, 
from Wall of Frame paper and then matted these onto black cardstock.

I also cut one of the larger frames from the Wall of Frame paper to hold my journaling.

Using Lifestyle Craft's Nesting Flower die I cut four layers from Home Grown
and four from Wall of Frame.
After I had inked the edges I scrunched them up to add some interest and dimension.
Art Glitter glue was used to attach the layers to each other.
One of the small wood buttons in the centre completed each flower.


I cut some leaves from the Family Ties paper using my Memory Box Cottage Leaf die.

I had also fussy cut several flowers from the Home Grown paper
to embellish the page. 

I cut a strip of Home Grown and Family Ties 3 1/2" long. 
I matted the Home Grown paper on black cardstock
and punched one of the long edges on the Family Ties paper
 using a Matha Stewart punch. 
I punched some black cardstock and matted the Family Ties paper onto it.


These two strips along with two of the larger fussy cut flowers
create a cluster at the top left area of my page.

A small fussy cut flower is attached at each end of my banner.
I also added a blue gem to the centre of each pennant.

I added Nuvo Jewel Drops - Sea Breeze to the centres of each fussy flower.

I have heat embossed the chipboard before attaching it to the layout.

I have a video showing 6 ways that I colour chipboard and this technique was one of them.
Here is the video if you would like to have a look at how I did this.


That completes my layout for today


Thank you for spending part of your day here with me today

Till next time
Stay safe
Hugs
Julie