Showing posts with label heat embossing. Show all posts

Wednesday, August 10, 2022

MTCC #61

Good morning

Today I am sharing the card I made for challenge #61 at Make the Card Challenge.

You will find the challenge here.

The challenge this month is a colour challenge.


I have used pastel shades of these colours on my card.


I used a background stamp with Versamark ink and white embossing powder
before blending Dried Marigold Distress Ink and 
Salt Water Taffy Distress Oxide Ink over the top.

My card base is 5 1/4" square

A 5" square piece of green cardstock is the base layer 
for the decorative panel that is 4 3/4" square.

A 1 1/4" x 5" piece of the green cardstock hold the sentiment, which is cut from white cardstock.
I have cut the sentiment 4 times and layered them on top of each other to create
a sentiment with some dimension.

I used Honey Bee - Lovely Layers: Heart Vine die to cut a green leaf spray, 
a paper chrysanthemum from PortaCraft and a couple of small white flowers 
from Uniquely Creative to create a cluster on the left hand section of the green panel.

You can watch my process video here
I hope you enjoy it.


As always, thank you for spending part of your day here with me today

Till next time
Stay safe
Hugs
Julie


Wednesday, July 13, 2022

Off The Rails Scrapbooking July 2022 Challenge

Hello hello

Today I am sharing the page I created for the July challenge at Off The Rails Scrapbooking.

You will find the challenge here.

The challenge is to use outback/desert colours.

Here is my layout


The photo on this page was taken during my trip to Egypt in 2019 when we were able to travel.

The top photo was one I purchased, it was taken many years ago from a slightly different angle to
mine but I wanted to show the "before & after" photos.

The papers I have used for this layout are from a Craft Concepts paper pad
called Vintage Grunge printed in 2012, so you can see I have had it in my stash for some time.

I chose a mustard coloured paper with brown script for the background.
The papers are double sided so I used both sides of the red spot paper plus the striped paper.

All of the papers were torn to size using my Deckle Rulz tearing ruler.


The red spot paper is approximately 5 1/2" wide, the striped paper is approximately 3" wide 
and the last paper is approximately 2" wide.
I used double sided tape to attach these to the background 
so they are evenly spaced across the page.

I used an emery board to file around the edges of my photos and 
matted them onto some cream cardstock.
They were attached to the layout with scrap chipboard pieces behind them.

I created the title using my computer.
I typed the title using Black Oak Std font in size 28.
This was printed onto a piece of the same cardstock that the photos are matted on.
Once it was trimmed to size I backed it with scrap chipboard pieces to attach it to the layout.

The cameras, tags and suitcase embellishments were stamped onto patterned paper and heat embossed.
The suitcase is a stamp from Magnolia, the tags are from Kaisercraft's Now Boarding stamp set 
and the cameras are from Kaisercraft's Happy Snaps stamp set.


Here is my video
I hope you enjoy it


Thank you for spending part of your day here with me today
Till next time
Stay safe
Hugs
Julie


Make the Card Challenge #59

Hi there

This is my first project as part of the Design Team at Make The Card Challenge (MTCC)

You will find the challenge here.

This weeks challenge is to use this sketch to create your card.


and this is the card I created


You can see I have changed the shape of the card from rectangular to square
as I prefer making square cards and I have given it a shabby chic feel.

My 5 1/4" card is cut from some pale blue/grey cardstock with a light fleck in it.

I have used Denise Boddey Designs - Le Jardin Romantique patterned papers for this card

I cut a piece of Garden Letters to 5" square
and a piece of Song Blossom to 4 3/4" square.
I also cut 3 x 3/8" strips of Natures Romance.

I used my Tim Holtz Distressing Tool to distress all of the edges 
before inking with Vintage Photo Distress Ink.

The two squares of patterned paper were attached to the front of the card
then a layer of fine glimmer mesh was laid on top of them.

The diagonal strips were attached using liquid glue which also holds the mesh in place.

I stamped and heat embossed the largest flower from 
Craft Barn's Primrose stamp and die set onto  Enchanted Florals paper.
This flower was cut in half before I added it to my fussy cut cluster.

The sentiment was cut from Gold Pearlised cardstock using 
Uniquely Creatives Brush Script Sentiments Die

Below is the process video for this card
I hope you enjoy watching it.


Why not pop over to MTCC and check out the cards made by the other DT members?

You will find the challenge here.

Till next time
Stay safe
Hugs
Julie

Tuesday, April 26, 2022

Fun Fold Shabby Chic Cards

I have got three fun fold cards to share with you today.


Card No. 1


I have used mauve cardstock for the base of this card

I cut pieces
11" x 4 1/4", 10 3/4" x 3 1/4" and 3 1/4" x 2 1/4"

I score and fold
the 11" piece at 2 3/4" & 5 1/2"
the 10 3/4" piece at 3 1/2"  & 6 1/2"
so both pieces resemble a Z

I have used Denise Boddey Day Dream Story Book - Dreams patterned paper.

I cut pieces
5 1/4" x 4"
2 @ 4" x 2 1/2"
3 1/4" x 3"
3" x 2 3/4"
4" x 3"

I also fussy cut the label with the florals attached from Denise Boddey ay Dream Story Book - Chapters patterned paper.

I used my Distress Tool and Black ink to distress the edges of all of the patterned papers.

The patterned papers are then attached to the two card panels. 
I have used double sided tape but you could also use glue if you wish.

I attached the smaller piece of cardstock to the larger piece of cardstock by attaching a piece of 1/2" double sided tape at both ends of the 10 3/4" piece of cardstock and layering it on top of the other piece so the larger section, of the 10 3/4" piece, is on the top of the card and the right hand edge is approx 1/2" from the right hand edge of the bottom panel.

The fussy cut piece is attached to the 3 1/4" x 2 1/4" piece of cardstock.
This is then attached to the front of the card with sticky backed foam behind it.

The sentiment is a stamp from the Woodware Word Fragments stamp set. I have stamped with Versafine Embossing Ink and heat embossed with Gold Embossing Powder.

Card No. 2


The cardbase for this card is Bazzill - Tutu Pink

I cut pieces
7" x 5 1/4" and 4" x 4"

I have scored and folded the 7" piece at 4 1/4" and the 4" piece at 1".

The smaller piece of cardstock is attached to the right hand edge of the larger piece so the fold butts up to the right hand edge and it is centred between the top and bottom of the card


I have cut pieces
5" x 4"
2 @ 2 1/2" x 5"
2 @ 2 3/4" x 3 3/4"


Once agin the edges have been distressed with my distressing tool and black ink.

The patterned paper is attached to the card panels using double sided tape.

To embellish this card I have cut Circle Frame Medium Chipboard in half and coated it with Gesso.
I attached the chipboard to the front of the card, next I layered a 4" strip if white lace and a fussy cut floral cluster from the same patterned paper.

The sentiment, once again came from the Woodware Word Fragments stamp set 
It is attached to the front of the card with a piece of scrap chipboard behind it.

Final touch for this card was to add three drops of Nuvo Drops - Morning Dew 
to the top and bottom of the left hand front panel.

Card No. 3


I have not made this style of card before.

It is a pocket with a decorated insert for your personal message or you could attach a gift card.

I have used a light green cardstock for this card.

I cut pieces
5 1/2" x 10 1/2" and 4 3/4" x 4 3/4"

I scored and folded the 10 1/2" piece at 5" and 10" on the long edge and 5" on the narrow edge
This is going to make a 5" square pocket

I cut the corner where the two fold lines meet out 
and the bottom 1/2" folded section on the other section of the cardstock.
You can see this more clearly in my YouTube video.

I have added double sided tape to the side and bottom tabs and folded the pocket in half 
using the tape to join the two sides together to form a pocket.

The patterned paper I am using for this card is Denise Boddey Designs - Elegance - Style

I cut 
2 @ 4 3/4" x 4 3/4"
2 @ 4 1/2" x 4 1/2"

Once again the edges have been distressed.

The patterned papers are attached to the pocket and the insert with double sided tape.

Before adding the patterned paper to one side of the insert use liquid glue to attach a piece of lace to make it easier to take your tag in and out of the pocket.

I used a circle die to cut a part circle from the top of the pocket. 
You could use a circle punch if you prefer.

To embellish the insert I fussy cut the castle from the patterned paper and attached it to the front. 
The back is for your personal message and/or to attach a gift card.

To embellish the front of the pocket I used liquid glue 
to attach 5 rows of lace to the bottom 3/4 of the pocket.

A piece of chipboard foliage, that has had a coat of Gesso, was layered onto of the lace 
and a fussy cut floral piece was added on top of that.

I used Craft Barn- Primrose Stamp & Die set to cut the flower from the same patterned paper.

A good coat of Wink of Stella Clear added sparkle to the chipboard.

The sentiment is from Uniquely Creative.

So these are the three cards for today.

For more detail you can see me create these cards in this video


If you have any questions please leave them in the comments below and I will get back to you.

Thank you for spending part of your day here with me today
Till next time
Stay safe
Hugs
Julie


Wednesday, March 16, 2022

Three inking techniques

Good morning.

Before I start my post today I would like to ask you to do something for me.
I spend a lot of time writing these posts and I wonder if anyone reads them. 

If you have visited my blog today could you please leave me a comment, even if it is just "Hi Julie"
Depending on the number of comments I receive to this post 
I will decide whether I will continue posting on my blog.

So please, if you visit my blog and enjoy reading what I post please leave me a short comment.

Now on to today's post.

I recently bought some new Distress Inks and realised I didn't use my inks often enough,
so today I am sharing three techniques using Distress/Oxide Inks.
I have mainly Distress Inks with a few Distress Oxides thrown in.

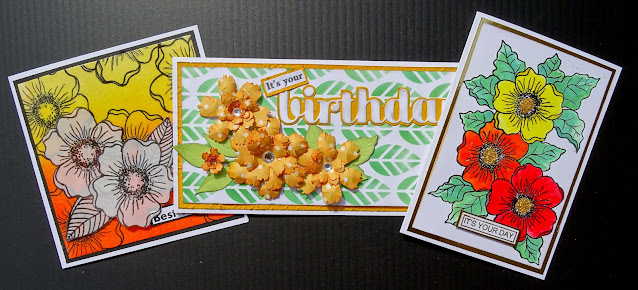
I made three cards


Each of the cards are a different size.

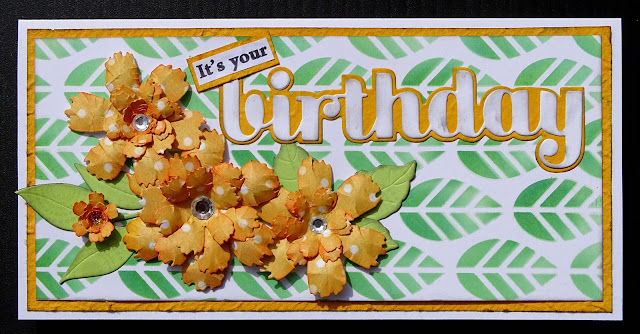
Card No. 1

This is a slimline card measuring 8" x 4" and fits into a standard DL envelope


I have cut 300gsm white cardstock to 8" x 8" and folded it in half. 

I used Cracked Pistachio Distress Oxide and Mowed Lawn Distress ink, 
 with a Hero Arts Blending brush, to apply colour through A Little Birdie leaf stencil.

I trimmed a piece of textured yellow cardstock to 3 3/4" x 7 3/4" and attached that to my card front.

Next I trimmed my inked panel to 3 1/2" x 7 1/2" and added that on top of the yellow cardstock.

To decorate the card I used some of the flowers I created in this video

I die cut the sentiment from white cardstock and the shadow from the yellow cardstock,
inked the edges and attached it to the front of the card about 2/3rds of the way up.


I printed the rest of the greeting, trimmed it to size, layered it onto a piece of the yellow cardstock and attached it so it was slanted and slightly over lapping the b of "birthday"

I also used the same stencil and some Squeezed Lemonade Distress Ink 
on the inside of the card.

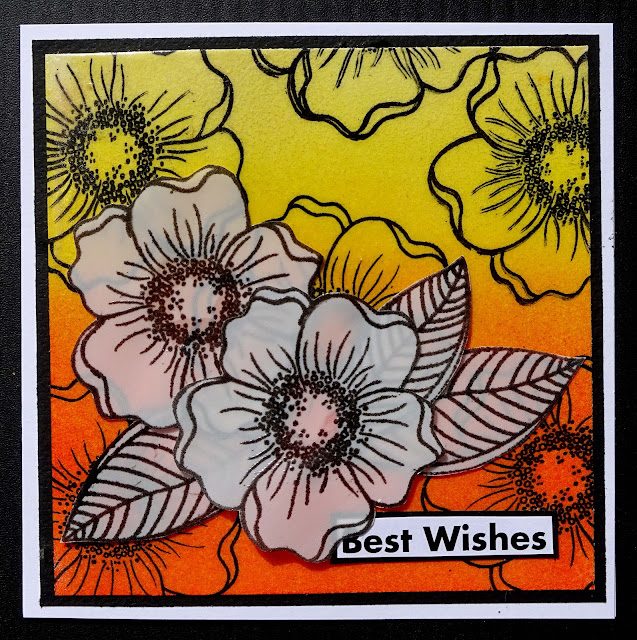
Card No. 2


This card is 5 1/4" square

I started with a piece of smooth white cardstock 5" square and blended Squeezed Lemonade, Mustard Seed, Spiced Marmalade and Ripe Persimmon Distress inks, starting with the lightest colour and 
working my way down to the darkest. I used a domed foam blending tool for this.

 to stamp all over the background using Versafine Onyx Black ink.

I added clear embossing powder and as the Distress Inks were still wet 
the embossing powder clung to the whole background. 
I had not planned on doing this but I have to say I am pretty happy with the results.
I gave it 3 or 4 coats of the clear embossing powder to get a nice high gloss.

I trimmed a piece of black cardstock to 5" square and 
the stamped panel to 4 3/4" square and layered them onto the card front.

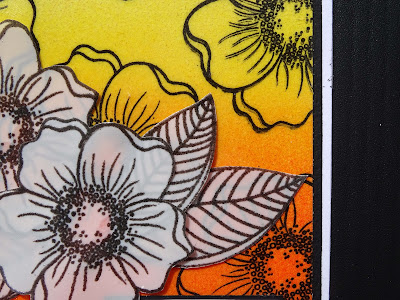
I did not want to completely cover the pretty background so I stamped a 
couple of the same flowers and three leaves from a Paper Artsy stamp
onto some Hero Arts velum. I stamped with Versafine Onyx Black Ink


I fussy cut the flowers out and used Art Glitter glue to attach the velum, 
applying the glue behind the embossing.

The sentiment came from a little pot of sentiments I keep on my desk. 
They are leftovers from kits, paper packs or excess stamping/heat embossing.
I matted the sentiment onto some black cardstock and added it to the bottom right of the card.

Card No. 3


Our final card for today is 4 1/4" x 6"

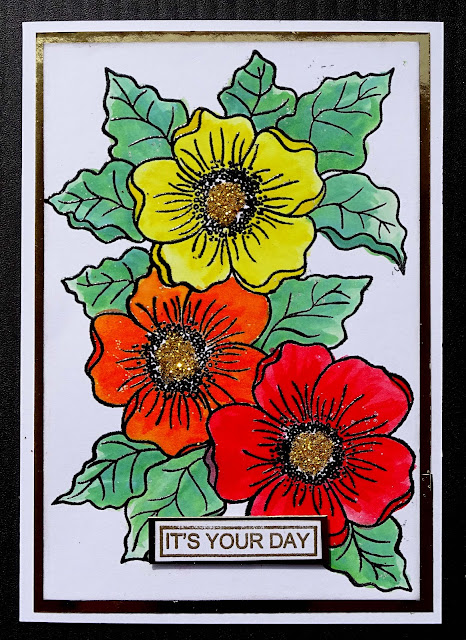
I am going to use my inks as watercolours for this card.


I used my water brush to apply the colour but you could use a normal brush if you don't have one.

I used two colours on each area.

For the leaves I used Cracked Pistachio Distress Oxide and Mowed Lawn Distress Ink

For the yellow flower I used Squeezed Lemonade and Mustard Seed

The orange flower is Spiced Marmalade and Ripe Persimmon

And the red flower is Candied Apple and Festive Berries.

You can see how I applied the ink and shading in the video below


I cut some Gold Mirri Card to 4' x 5 3/4" and trimmed my flower panel to 3 3/4" x 5 1/2" 
and layered them onto the front of the card base

The sentiment is from the same place as the previous one and is gold heat embossed.
I matted it onto a piece of the gold mirri card and attached it to the card front 
with a piece of scrap cardboard behind it.

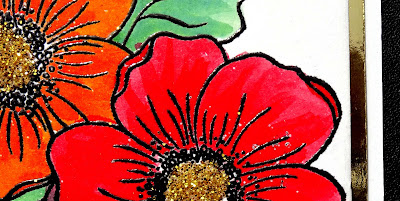
A final touch to this card was to add some gold fine glitter to the centres of the flowers.

So there we have my three cards for today.
I hope you have enjoyed reading about them and I hope you will leave me a comment.

Here is the process vide.
Have fun watching it


Thank you for spending part of your day here with me today
Till next time
Stay safe
Hugs
Julie

Sunday, March 13, 2022

DT layout for Off the Rails Scrapbooking

Good morning

My layout today was created for the Moodboard over at Off the Rails Scrapbooking

This is the Moodboard


This is my layout


I have used Kaisercraft's Now Boarding and After Five patterned papers.
They are very old and I don't think they are still available.

I have trimmed the mustard coloured cardstock for the background to 11 1/2" square.

I trimmed the bottom of the mustard cardstock on an angle from the bottom left corner up about 1" on the right hand edge and backed that with a piece of Now Boarding - Terminal patterned paper.

The mustard background was attached to black cardstock.

I used TCW Chevron Tiles stencil and Ripe Persimmon Distress Ink, applied with my domed blending tool, to create a pattern on the mustard cardstock.

I also ran around the edge of each of the squares on the stencil with a fine black pen to outline each shape.

Now Boarding - Cabin Crew was trimmed to 6 1/2" x 8"
After Five - Corsage was trimmed to 3" x 10 1/2" A fishtail was cut in each end
Now Boarding - Boarding Pass was cut to 2 1/4" x 9 1/2" A fishtail was cut in each end

All of these were then matted onto black cardstock that was cut a 1/4" larger, 
giving a 1/8" boarder all around.

The photos were also matted on black in the same manner.


These were attached to the layout. The largest piece of patterned paper and the photos were 
attached with cardboard behind them.

To embellish the page I used a tab from the collectables pack and several items that I had stamped, heat embossed and fussy cut using a Kaisercraft stamp set. 
I can't remember the name of the stamp set but I could look it up if anyone would like to know its name.


The title was printed on Now Boarding - Boarding Pass and attached between the two photos.

Here is my process video
I hope you enjoy watching it.


Thank you for spending part of your day here with me today

Till next time
Stay safe
Hugs
Julie


Friday, March 11, 2022

Mystical Scrapbooks March Cyber Crop

Good Morning

The layout I am sharing with you today is for the March Cyber Crop over at Mystical Scrapbooks

The theme this month is Mood boards and the mood board I have used for this layout is this one.

I have used the colours for my inspiration, although I used paler tones of the pink and mauve.
I have also added gold to the mix


 I have used Studio 73 - Timekeeper patterned papers for this layout.

The Pink background frame is plain cardstock

The 11 1/2" patterned paper that is layered on top of the pink cardstock is the Clock Keeper paper.

I have used my TCW Tile Texture stencil to add Deco Foil - Transfer Gell Duo 
to the whole background. I let this dry and then rubbed foil on top.

I used two foils for this, one is a blue/purple mix that I have had in my stash for approximately 20 years,
the other was Gold Fab Foil.
I was really happy with the mix of the two foils.

From the Feathery Friends paper I fussy cut the large image that takes up the right hand edge of the page.
I inked the edge of it with my black VersaColor ink cube, added cardboard to the back then used liquid glue to attach it to the layout along the right hand edge of the page.

To embellish the page I fussy cut seven tags from the Tag & Shapes paper,
inked the edges, added a black eyelet using my Crop-O- Dile 
and threaded some black & white Baker's Twine through the eyelet.

I have used two 6" x 4" photos and a 1 3/4" x 1 3/4"photo.
I filed the edges of the photos with an emery board before attaching them
so some mauve cardstock leaving a very fine border.

The photos and tags were attached to the page using double sided tape.

I attached two tags to the bottom right of the page.
One is flat on the page and the smaller one has some cardboard behind it to raise it a little.

From the Memory Maze - Criss Cross Hearts chipboard set I chose one of the open hearts and one of the small solid hearts and added gold foil to them

The larger heart was attached on top of the two tags at the bottom of the layout and the small heart was attached to the bottom left corner of the bottom photo

The title comes from the Dusty Attic - Mini Captions #1 chipboard pack

I have heat embossed this using Versamakrk Embossing Ink and 4 coats of black embossing powder.

Here are a few closeup photos.


Here is my process video.
I hope you enjoy watching it.


Thank you for spending part of your day here with me today

Till next time
Stay safe
Hugs
Julie


Tuesday, March 1, 2022

Mystical Scrapbooks March Challenge

Hi there.

Today I am sharing the layout I created for the March challenge over at Mystical Scrapbooks.

The theme over there this month is mood boards and there are two of them to choose from
 or maybe even create a layout for both of them.

This is the moodboard this layout was created for.


This is my layout


The background for this layout started life completely different to how it links now.

I gave my white cardstock a coat of white Gesso.

Originally I used Distress Inks and plastic packaging to colour where the red is now. 
I used Barn Door but when it dried it was more pink than bright red.

Not happy with the colour I used a sponge to dab red acrylic paint over the top of the ink.
I then splattered white acrylic paint over the red.

The flower frame is a cut file from Page Evans

I stamped a text stamp with StayzOn Jet Black ink all over the cut file.

I used Distress Ink Mustard Seed and a wet brush to colour the cut file and then
Carved Pumpkin and a fine brush to add a little detail to the centre of the flowers.

I punched a few circles from white cardstock, stamped them with the same stamp and ink
to fill the holes in the centre of the flowers.

I used Art Glitter glue to attach the cut file to the page 
so it sat over the painted section of the background.

I am using a 6" x 4" photo, I filed around the edge of the photo with 
an emery board before matting it onto some orange cardstock.

I also added some cardboard to the back of the mat.
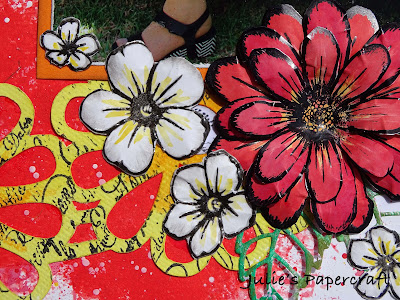
This assembly was then attached to the layout.

I used Heartfelt Creations Daisy Patch Flowers to stamp and heat emboss three layers of the flower.
I used Mustard Seed and Barn Door Distress Inks to colour the flower.

I also stamped and heat embossed Picket Fence - Flowers for the Picking.

I used my flower shaping tools to shape all of the flowers.

All of the flowers were attached to the layout with liquid glue.


I trimmed my white background down to 11 1/2" square and matted it 
onto a 12" piece of black cardstock to give it a nice dark border

The title was die cut from black cardstock using my 
Kaisercraft DD700 Alphabet Upper Case dies
and attached using my t-ruler and liquid glue.

I used my fountain pen to draw a double scribbly border around the page and the flower centres

I have a process video you might like to watch


Thank you for spending part of your day here with me today.

Till next time
Stay safe
Hugs
Julie


Friday, February 11, 2022

Mystical Scrapbooks Cyber Crop

Good morning

Today I want to share the layout I created for the February Cyber Crop at Mystical Scrapbooks.

This is the sketch I used.


This challenge requires you to use the sketch and to add gold to your project.

Here is my layout


The outer frame of the layout is Kaisercraft's Time Machine - Mechanism paper that I have cut the middle out of leaving a 1" frame.

The background of the layout is Uniquely Creative's Drive & Fly - Engine paper
 that I have trimmed to 11 1/2" x 11 1/2"

I used Kaisercraft's Crackle stencil and some black Gesso randomly to add some interest at the top and bottom of the layout.

Once the gesso was dry I rubbed Art Alchemy Metallique Wax in White Gold.

I trimmed Uniquely Creative - Drive & Fly - Train to 7 1/2" x 12"
and two strips of Mechanism 3/4" x 12".

The strips were added to the 12" edges of the Train paper

Next I trimmed a piece of Kaisercraft - Time Machine - Ironclad to 4" x 10" and tore the two 4" edges.

A little more gold was added to the layout by heat embossing a frame from Memory Maze's Junky Frame and Arrows chipboard with embossing ink and Stampendous Aged Gold embossing enamel.
I cut the frame in half so I could off set it on my layout.

I used an emery board to file around the edges of my photos and matted them onto the Mechanism paper.
I also added some scrap chipboard to the back of the photos.

I used my Scan N Cut to cut my title and three tropical leaves.

Time now to attach all of my elements to my page. I used Art Glitter glue for this.

Here is my process video


I hope you pop over to Mystical Scrapbooks and check out the Cyber Crop

Till next time
Stay safe
Hugs
Julie