Wednesday, July 27, 2022

MTCC #60

Hello

Today I am sharing the three cards I created for Challenge #60 at Make the Cards Challenge.

The challenge is to have a black background for your card.
I made three cards.


All of my cards have a white 5 1/4" square base made from white cardstock.

I cut three 5" square panels of black cardstock to use as my card front panel.

Each of my cards has had a layer of Deco Foil's Transfer Gel Duo applied through a stencil.

The mandala and flower stencil do not have any 
brand name on them but the other one is TCW - Mini Labyrinth.

Card No. 1


I applied a pearl powder over the design on this card using a soft brush.
The colour I used is #673 Interference Violet and as you can see it is quite bright.

Once the design was covered with the powder I wiped over the whole panel 
with a dry tissue and all of the excess powder came off

I attached my black panel to a piece of purple cardstock that is 5 1/4" square 
and attached that to my card front.

To embellish the card I cut a floral emblem from an all over piece of lace
and attached that using Art Glitter glue.

The sentiment is from a kit by Uniquely Creative.

Card No. 3


I have burnished Rose Gold gold leaf into the design on this card.

Add some of the loose gold leaf to your card front and then rub it into the design using your finger.
You need to be relatively firm in your application.
Once the design is covered brush the excess flakes off.

I have cut a piece of co-ordinating metallic paper to cover the front of the card base and then added my black panel to that.

A transparent sticker from Kaisercraft's Happy Birthday sticker pack, 
was added to a piece of the same paper I used for the background.
I cut a fishtail in each end of the title piece before attaching it to the card front 
with a piece of scrap chipboard behind it.

A fine piece of lace was added to the bottom of the black panel 
before the panel was attached to the card front. 

Card No. 3


To enhance the design on this panel I used Deco Foil -Summer Rainbow foil.

A piece of foil was laid over the design and then I rolled over it with my brayer.
You can use your fingers or a bone folder if you do not have a brayer

The sentiment is from Paper Rose's Big Sentiments 1.0 pack.
I have run that through my laminator with the same foil.

Here is my process video


I hope you enjoy watching my video

Thank you for spending part of your day here with me today
Till next time
Stay safe
Hugs
Julie


Sunday, July 24, 2022

Cinderella Junk Journal Embellishment No. 1

Hi there

A quick post today just to share some embellishments I created for my 
Cinderella Little Golden Book Journal

I have used a 12" x 12" sheet of Kaisercraft's Peachy Collection -Burnt Sienna
double sided patterned paper to create the five items


There are so many items and so much detail in these pieces that I would find it just about impossible to describe the process to you so I am adding my process video here for you to watch if you would like to see how these pieces were made.


I was inspired to make this after watching a video by Paper Inspirations
You will find Sue's video here.

Hope you have fun watching my video and get inspired to make some of your own.

Thanks for spending part of your day here with me today
Till next time
Stay safe
Hugs
Julie


Sunday, July 17, 2022

Denise Boddey DT Four page album

Hi there

Today's post is about a mini album I created using Denise Boddey's
Day Dream Story Book paper range.

I have a video that I will add at the bottom of this post.


To create this album you need 4 sheets of 12" x 12" patterned paper.
The paper I have used is double sided.
If you make this album you could add as many pages as you wish

The papers I used are Dreams, Day Dream, Our Story and Princess for a Day.

For each page:-
score at 6" with the paper right way up,
flip to the left and score at 9" (this will be at the bottom of the page)

Select the paper you want for the front cover,
use glue to attach the back outside panel of this paper to the front outside of the next panel.

Continue doing this until all pages are attached.
If you prefer you could only glue around the edges of each page and create pockets between each page.

I cut a piece of patterned paper 1" x 9" to create the spine cover.

Next I used my corner rounder on the top and bottom outside edges of each page.

Run a small bead of glue along the outside edges of the pocket on each page.
You could run glue along the centre fold too if you prefer.

I used Vintage Photo Distress Ink and my distressing tool to ink around the edges 
of each page and pocket edges

I created eight tags to go into the pockets.

I used 300gsm white cardstock to create the tags, they measure 4 1/2" x 8 1/2".
The patterned paper has been cut to 4 1/4" x 8 1/4".
I inked the edges and attached the patterned paper to the front of the tag.

I added an eyelet to the top of each tag using my Crop O Dial and
added some white seam binding through the eyelet.


Using my Big Shot I die cut flowers using patterned paper and pale pink velum 
and Couture Creations CO724161 die.

I cut some leaves using Honey Bee's Lovely Layers Heart Vine and Uniquely Creative Little Leaves dies

Using Uniquely Creative Island Texture die and the same papers/velum I cut some background fillers

Other embellishments I used were lace and gauze/cheese cloth and Ali Lattice chipboard panel

You will see the embellishing in the video.

I hope you try making this little album. 
It is easy to make, a good size and can be changed and embellished in so many ways.


Have a great day
Till next time
Stay safe
Hugs
Julie


Friday, July 15, 2022

July Cyber Crop at Mystical Scrapbooks

Good morning

I have got a layout to share today.
I created this layout for the Cyber Crop at Mystical Scrapbooks.
You will find the Cyber Crop here

There are three challenges in this Crop and this layout if for the challenge 
that requires you to use a flip on your layout.

You can see what I mean in the photos below.

The centre photo opens out to reveal two more photos underneath.


I used papers from the Uniquely Creative Steampunk Safari collection for this layout.

To create the background I used Scattered Straw and Rusty Hinge Distress Inks through 


I have two photos measuring 3 1/2" x 6" and three measuring 3" x 6".
The smaller photos are in the flip section of my layout.
I used Steampunk Safari - Technical paper to matt the photos and to make the flip.

I used Uniquely Creative's Steampunk Safari - Awesome and Basic Grey's Green at Heart - Kermit papers behind the two outside photos along with a piece of the same cardstock I used to matt the whole layout.

I have sewn around everything with my sewing machine and black thread, 
including a circle in the middle of the layout.

To embellish the layout I used some items from the Steampunk Safari Creative Cuts 
and some fussy cut items from Steampunk Safari - Unique patterned paper

I cut the title from black cardstock using my Kaisercraft DD700 Alphabet Upper Case die.
I added a coat of Glossy Accents.

My process video is below.
In the video I also show you how I add my layout to a page protector 
in my album so the flip can be opened.


Don't forget to pop over to Mystical Scrapbook and check out the Cyber Crop

Thanks for being here today
Till next time
Stay safe
Hugs
Julie

Wednesday, July 13, 2022

Off The Rails Scrapbooking July 2022 Challenge

Hello hello

Today I am sharing the page I created for the July challenge at Off The Rails Scrapbooking.

You will find the challenge here.

The challenge is to use outback/desert colours.

Here is my layout


The photo on this page was taken during my trip to Egypt in 2019 when we were able to travel.

The top photo was one I purchased, it was taken many years ago from a slightly different angle to
mine but I wanted to show the "before & after" photos.

The papers I have used for this layout are from a Craft Concepts paper pad
called Vintage Grunge printed in 2012, so you can see I have had it in my stash for some time.

I chose a mustard coloured paper with brown script for the background.
The papers are double sided so I used both sides of the red spot paper plus the striped paper.

All of the papers were torn to size using my Deckle Rulz tearing ruler.


The red spot paper is approximately 5 1/2" wide, the striped paper is approximately 3" wide 
and the last paper is approximately 2" wide.
I used double sided tape to attach these to the background 
so they are evenly spaced across the page.

I used an emery board to file around the edges of my photos and 
matted them onto some cream cardstock.
They were attached to the layout with scrap chipboard pieces behind them.

I created the title using my computer.
I typed the title using Black Oak Std font in size 28.
This was printed onto a piece of the same cardstock that the photos are matted on.
Once it was trimmed to size I backed it with scrap chipboard pieces to attach it to the layout.

The cameras, tags and suitcase embellishments were stamped onto patterned paper and heat embossed.
The suitcase is a stamp from Magnolia, the tags are from Kaisercraft's Now Boarding stamp set 
and the cameras are from Kaisercraft's Happy Snaps stamp set.


Here is my video
I hope you enjoy it


Thank you for spending part of your day here with me today
Till next time
Stay safe
Hugs
Julie


Make the Card Challenge #59

Hi there

This is my first project as part of the Design Team at Make The Card Challenge (MTCC)

You will find the challenge here.

This weeks challenge is to use this sketch to create your card.


and this is the card I created


You can see I have changed the shape of the card from rectangular to square
as I prefer making square cards and I have given it a shabby chic feel.

My 5 1/4" card is cut from some pale blue/grey cardstock with a light fleck in it.

I have used Denise Boddey Designs - Le Jardin Romantique patterned papers for this card

I cut a piece of Garden Letters to 5" square
and a piece of Song Blossom to 4 3/4" square.
I also cut 3 x 3/8" strips of Natures Romance.

I used my Tim Holtz Distressing Tool to distress all of the edges 
before inking with Vintage Photo Distress Ink.

The two squares of patterned paper were attached to the front of the card
then a layer of fine glimmer mesh was laid on top of them.

The diagonal strips were attached using liquid glue which also holds the mesh in place.

I stamped and heat embossed the largest flower from 
Craft Barn's Primrose stamp and die set onto  Enchanted Florals paper.
This flower was cut in half before I added it to my fussy cut cluster.

The sentiment was cut from Gold Pearlised cardstock using 
Uniquely Creatives Brush Script Sentiments Die

Below is the process video for this card
I hope you enjoy watching it.


Why not pop over to MTCC and check out the cards made by the other DT members?

You will find the challenge here.

Till next time
Stay safe
Hugs
Julie

Tuesday, July 5, 2022

Booklet for Cinderella Junk Journal

Good morning

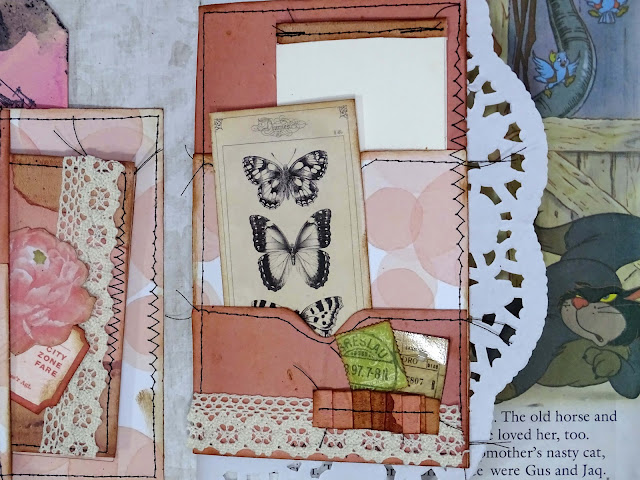
I have created a Junk Journal using a Cinderella Little Golden Book

This project is a booklet to go into a pocket in that journal.


I have used two pieces of white cardstock measuring 12" x 8 1/2"

Fold each piece in halves one way, open the paper and fold in half the other way
this will give you a 12" x 8 1/2" piece that has four sections.

With the 12" edge at the bottom, cut up to the centre fold line on the short fold line.
Do this to both pieces of cardstock.

With the cut section at the bottom, fold so the two short edges are together.

Fold the two bottom sections up to create a 6" x 4 1/4" section.
Glue the double section along the edges to create a top loading pocket.

To join the two sections together apply glue to the top, bottom and one long edge
 to the back section of one booklet and attach this to the front of the other booklet.

I cut a piece of patterned paper 6 1/4" x 8 3/4" and wrapped this around the booklet. 
I attached it with glue, making sure there was no glue attached to the spine area.

I created tags using plain pink cardstock.
I added tabs that I punched from the same patterned paper I used for the cover, 
using my McGill File Tab 3" Punch


There are lots of areas for journalling in this booklet.

You can see how I created this booklet in my video


I hope you enjoy the video and attempt one of these booklets.
They are not as complicated as they sound in this post as you will see in the video.

Till next time
Stay safe
Hugs
Julie


Friday, July 1, 2022

Mystical Scrapbooks July Challenge

Good morning

Today I have a layout to share.

I created this layout for the July challenge at Mystical Scrapbooks.
The challenge requires all of the patterned paper used on your project to be matted on black cardstock.
You will find the challenge here.

Here is my layout


I have used Cocoa Vanilla - These Days papers for this layout

All of the black matting layers are 1/4" wider and 1/4" taller than the patterned papers
giving me a 1/8" border all around.

I cut:-
Wall of Fame 5" x 6" 
Family Ties 5 3/4" x 4 1/2" and 1 1/2" x 3" (I cut a fish tail in the narrow end of this piece)
Take Flight 1 1/2" x 3" (I cut a fish tail in the narrow end of this piece)
Home Grown 3/4" x 2 1/2" (I cut a fish tail in the narrow end of this piece)

I fussy cut 10 butterflies from the Take Flight paper to use as embellishments.
The wooden buttons from this range were also used.


stencil onto a sheet of white cardstock.

Once this was dry I added Glimmermists - Lily Pad and Dew Drop
and a little Dylusions Ink Spry in Slate Grey

Half a piece of Memory Maze Pick Up Sticks Frame Square chipboard
was given a patchy coat of black acrylic paint over the top of the silver acrylic paint 
that had been applied when I used the other half of the chipboard.


The butterflies were layered on top of each other to give me five butterflies to use on my page.


The title was cut from black cardstock using Sizzix 662667 Alphabet die.
Once it had been attached to the layout I gave it a coat of Glossy Accents.

Three sets of three dots using Nuvo Vintage Drops - Peachy Keen finished my layout off.

To watch this layout come together click on the video below.


Thank you for spending part of your day here with me today
Till next time
Stay safe
Hugs
Julie